Filters for “Protection”

I remember buying my first expensive lens—Nikon’s 18-200 super zoom—like it was yesterday. It was hopelessly out of stock just about everywhere, but I stumbled upon one at “Japan Camera” in my once sleepy local mall, and snapped it up. With that lens mounted in my trusty D70s, I was ready for anything. Soon after, I walked into Henry’s1 to inquire about a Circular Polarizer. The sales-guy asked, “For what lens?” As I proudly swung my camera ’round to show off my new baby, the sales-guy gasped and exclaimed “You’re running that thing ‘naked’?!?”

He totally got me. While I knew I could probably find a “protective UV filter” online for less money, I didn’t want anything to happen to my precious before I got it. The sales-guy hammed it up, carefully placing the LCD-side of my camera on a cloth, took out his Rocket Blower, and gingerly puffed what little dust might have found its way on the front element like he was performing heart surgery. Out I walked with a genuine Hoya Super Duper HMC Deluxe filter with about 8,000 coatings and 99.999967% light transmission or whatever.2

I bet a lot of you reading this have similar stories or have seen sales-people in action, preying upon an unsuspecting lens purchaser with a filter to protect their “investment.”3 I heard the “protective UV filter” line at Exposure just this past weekend and couldn’t help but cringe.

I’ve learned a lot since that filter purchase. First of all, that 18-200 was pretty terrible, optically. Secondly, if I want constant “protection” for my lens, I’ll use the hood, which can improve picture quality, rather than degrade it. For those of you who want to keep your lens as compact as possible and hate the idea of sticking a huge hood on the end of your lens, leave it at home, leave the filter locked up behind the counter, and take some care not to smash the front of your lens into tree trucks.4

Now before you pop open a new tab to search for that example of some dude who dropped their expensive lens and was saved by their $100 filter that smashed into bits, I’ve probably already seen it. Yes, accidents can happen. I myself dropped my Nikon 24mm f/1.4 lens on a hard tile floor, denting the front filter ring. That is not an inexpensive lens, I was careless, and it cost me. The repair was somewhere in the neighbourhood of $250. Ouch. It would have been fine if I had the hood on. It might have been fine if I had a filter on, but you know what? I haven’t bought a “filter for protection” for any of lenses I’ve owned since then, and I’ve owned a lot of lenses. There is no doubt that I’ve saved significantly more not buying filters for all those different lenses5 than I’ve spent repairing lenses due to lack of protection.

Of course there are other reasons for attaching a neutral clear filter6 on the front of your lens. Some hate lens caps, preferring a filter in their stead. Others shoot at company parties where cocktail spills are a certainty, not just a slim possibility. Totally understandable, but if you’re not in hazardous conditions and you’re after absolute lens acuity, shed that filter with impunity, never mind dust, get yourself a Rocket Blower, and put your hood on to reduce flare and really protect your lens.

  1. The largest photography chain in Canada.
  2. No matter how good the glass is, at certain angles it will refract light. This is another problem I have with putting a piece of glass that doesn’t alter my image creatively in front of a very expensive lens. If you have to protect your lens, get a hood.
  3. Unless your lens appreciates in value, it isn’t an investment.
  4. See video.
  5. Step-up rings will only cover so many sizes, and having to swap lenses is already a pain. I can’t imagine having to swap filters too.
  6. This is the kind you want, not a UV filter which does nothing for digital cameras outside of degrade picture quality and cost more. I personally like Hoya’s clear filters for anything that’s not neutral density where I go for Breakthrough Photography’s X4 filters.

X-T1 Autofocus Speed

A disappointing showing from the Fujifilm X-T1 in The Camera Store’s “Great Mirrorless Camera Autofocus Shootout,” in which they pitted the X-T1 against the Sony A6000, Olympus’ OMD E-M1 and the Panasonic GH4.

While Chris Niccols assures us that they they’ve chosen the best glass available on each platform, I don’t think the variable aperture FUJINON XF 55-200mm has any business being in an AF speed challenge of any kind, and I have a feeling Fujifilm would like him to redo this test once their FUJINON XF 50-140mm f/2.8 hits the market. It’s tough to fault The Camera Store for choosing the 55-200mm though, as the only other option for them would have been the “consumer grade” FUJINON XC 50-230mm, which is likely to perform even worse. Still, a disclaimer or two might have been appropriate.

Another thing I think they should have touched on in the video, is that the GH4 has an MSRP that’s just shy of 50% higher than the X-T1 or the E-M1. If I were spending another $600 on top of the X-T1’s price, you better believe I’d be expecting better AF speeds. Then there’s the A6000. At half the price it shouldn’t be able to leave both the X-T1 and the E-M1 in the dust, but that’s exactly what it did. Impressive. The big surprise for me was the E-M1’s poor single point performance. Every time I handle that camera, I almost marvel at how quick it seems to lock on focus.

Most remarkable is that the GH4 apparently held it’s own against the D4S. That is astounding considering you could get every mirrorless body in the comparison for the price of a D4S and pro zoom. Twice.

The key takeaway is that mirrorless cameras have caught up to, and surpassed DSLRs in their price-point. This has to make you wonder what just about any camera manufacturer1 could do with a $3,000+ mirrorless camera body—let alone one that costs $7 grand—and it makes me excited to see what the X-Pro2 will be capable of.

  1. Aside from Sony’s A7r, but that full frame sensor eats up too much of the MSRP to afford much opportunity for blazing AF speeds.

The ONA Bowery vs. The Billingham Hadley Small

ONA Bowery Billingham Hadley Small.jpg

For a change of pace from my usual “versus” articles, I finally got around to writing up my thoughts and comparisons of these two highly sought after bags. One is from ONA and the other, Billingham. Both bags are fantastic, but which bag comes out on top? Read on to find out.

The ONA Bowery vs. The Billingham Hadley Small

The X-T1 is ready

There were a couple of issues that plagued the release of the X-T1. The first that most already know about, was the light leak. The second, slightly less well know is this, the directional pad of buttons (or D-pad) used for menu selection was mushy, somewhat unresponsive, and quite unsatisfying to use.

I want to state early in this post that for any of you who have been reading my thoughts and comparisons of the X-T1, and are concerned about the crummy buttons, you can now safely buy a new X-T1 that has a much better D-pad than those found on the pre-production units, and the the initial run of manufacturing.1 If you’re buying from a store, you can easily tell if you’ve got a good one through the plastic baggy that the camera ships in, so if the dealer is reluctant to crack the Fujifilm sticker-seal, it’s no problem. Just test the buttons through the bag. If the buttons click like this, you’re good. As we know the light leak issue has also been addressed, and clicky buttons also seem to indicate light tightness.

Taking responsibility

Fujifilm came forward pretty quick, acknowledged the light leak, and offered a fix for owners with afflicted cameras. With the D-pad, they have been pretty tight-lipped about the problem. I can only surmise this is because the earliest D-pads, while crappy, do technically work. They’ve also been somewhat cagey about whether or not rumours about X-T1’s going in for service for the light leak, and coming back with a better D-pad are true.2 I’ve heard from at least two other owners that cameras sent in for light leak repair—with the D-pad noted on the bill of service—have come back with the D-pad marked as having “no fault.” This was also my experience. Again, while technically true as the buttons can be considered as not having “fault,” and work as originally designed, the fact remains that manufacturing has been quietly adjusted. X-T1’s are hitting the streets in high quantity with substantially better buttons on their back sides. This isn’t luck of the draw.

The bad news

Unfortunately some early adopters are being left out in the cold. I actually went to the extreme of selling my launch X-T1 privately,3 and buying another. For many, this won’t be worth the loss on the retail price, but it was for me. I can now use my X-T1 without mild feelings of contempt.

The good news

A silent tweak to manufacturing is better than no tweak at all, and that tweak means my biggest, and really only major gripe about the X-T1’s handling has now been addressed.

For those of you still waiting to place your order, now is the time. The more time I spend with this camera, the more I like it, and the more I feel it is the interchangeable Fuji body to own. I’m about to download and install the X-E2 firmware, but I’m confident the X-T1 will still be my primary body, rain or shine.

Fortunately, Fujifilm don’t have a history of releasing X-Series camera bodies with manufacturing issues like these. I don’t think we’re in a “wait and see” position when Fuji release their next camera (yet), but I’m hoping to see better QA with their next release.

  1. I’m not positive, but serial numbers of cameras with the poor D-pad seem to approximately coincide with up to and including the light leak range of serial numbers. Possibly a little beyond. For instance, my X-T1 that suffered both issues was had a starting serial number of 41A05. My new X-T1 is 41A09. My undestanding is ≥41A06 have no light leak.
  2. The official response I got was “Our technicians check all aspects of the camera.”
  3. For the record, I noted in my listing that it was a launch unit with a poor D-pad. Fortunately I was at least able to say it had no light leak.

X-T1 vs. X-E2 vs. X-Pro1

Fuji Fujifilm X-T1 vs X-E2 vs X-Pro1.jpg

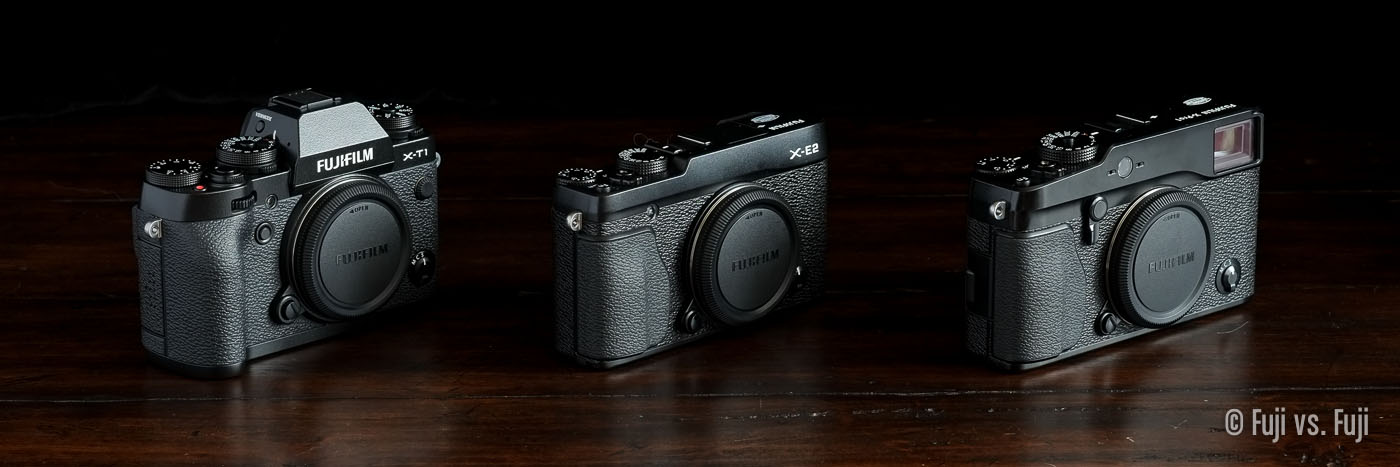
Another complete overhaul. This time, it’s my X-T1 vs. X-E2 vs. X-Pro1 page. It is still getting a remarkable amount of traffic, so I figured I would remove the rumour content. I didn’t stop there though. I’ve added a bunch of comparison images, and written up some impressions on how the overall handling of each compares to the others. I also cleaned up the table, which can still be found towards the bottom of the page.

What is perhaps most interesting about these three cameras now is how well the X-Pro1 still holds up, and how the X-E2 has faded away slightly. It’s still an extremely good camera, but it might be the overlooked middle child of the Fujifilm family these days.

X-T1 vs. X-E2 vs. X-Pro1

Adobe’s Fujifilm Camera Calibration Profiles

Another new page has been added to the “Extras” menu called Adobe’s Fujifilm Camera Calibration Profiles This will be another evolving oage. Currently it has just one images with each of the Fujifilm-endorsed profiles for a quick visual comparison, and brief analysis. This is pretty heavy duty pixel-peeping stuff, but it’s interesting nonetheless. I feel little shame in being picky about the end result of my images.

I’ll add the lake and valley image seen in my X-Trans Before & After page next so we can have a close look at how landscapes and greens are handled.

Adobe’s Fujifilm Camera Calibration Profiles Compared

Film Simulation Modes Compared

Fuji Fujifilm Film Simulation Modes Provia Astia Velvia PRO Neg Hi Std.jpg

A second subject has been added to my Film Simulation Mode comparison page. I figured the large areas of bright, bold colour against the deep shadows of the black background would make it very easy to see what’s happening between each mode.

More test subjects are yet to be added like a landscape, cityscape and a portrait, but I think next on the agenda is comparing Adobe’s Camera Calibration profiles with the in-camera rendering of each Film Simulation Mode.

Film Simulation Modes Compared

FUJINON XF 14mm f/2.8 Review Posted

My review of the XF 14mm F2.8 has been posted. I intend to keep my individual lens reviews about making images, and less about pixel peeping. They’ll includes real world samples to help give an idea of the kinds of images that can be made with the lens.

This is not to suggest my images are of outstanding quality. Some I’m pretty proud of, while others are included to illustrate the diverse capabilities of the lens.

The 14mm f/2.8 is a fantastic lens. Find out of it’s the wide-angle lens for you in my review.