Published September, 2014
This article will compare the default demosaicing of select RAW converters, and my impressions on the user experience of attempting to extract optimial detail from Fujifilm’s X-Trans sensor.


Introduction
Now that Fuji’s X-Trans sensor has been out on the market for almost 3 years, plenty of RAW converters have arrived on the scene to let Fuji shooters eke the most detail out of their sensors. Some converters are definitely better than others, but it would require a small fortune, and a lot of time to acquire and test each of them in order to find out which delivers the best results. Armed with a couple new purchases, and even more demo liceneses, I hope to do just that.
Note: I’ll be comparing everything from icons, to user interface and user experience from a Mac perspective in addition to demosaicing capabilities. I’ll add my thoughts and impressions here, but your eyeballs and taste will ultimately decide which software produces the “best” image quality.
Icon
Let’s get this somewhat trivial stuff out of the up front. I know that looks shouldn’t matter, but for me, they do. I like having nice things to look at while I work, and the Art Director in me can’t let a gross icon go unnoticed, or uncriticized.
Aperture 3: It’s Apple so it damn well better look nice, and it does. It’s a real shame there will soon be less reason to have this application in our docs unless they decide to continue adding support for cameras to it.
Capture One 7: Bit of a similarity here, isn’t there? It’s a nice icon, and I don’t mind having it in my Dock.
Iridient Developer 2: I have a sneaking suspicion the icon wasn’t high on the list of priorities here. It’s a cute idea for an icon (if you squint you can make out a newly developed picture in either the developer, stop bath, or fixer trays with tongs), but it’s so brutally low in resolution it hurts my eyes a little.
Lightroom 5: This icon simply takes after the brand standards Adobe have applied to all their icons. I like it fine, although I still find the size of the square too large next to other icons in my Dock.
LightZone 4: Yeesh. Open source. Free. Yeah, I get it, but come on. You can actually see a fringe of white along the top edge. Photography and design aren’t exactly worlds apart as far as hobbies go. Someone who works on this software must have the skills to produce a better icon.
Nik: Nik’s plug-ins have taken on this sort of origami look too them. Their nice enough, and an improvement from where they were, but still largely meaningless.
OnOne Perfect Photo Suite 8: I don’t mind the old school camera dial OnOne has used.
PhotoNinja 2: So much wasted potential here. The little ninja is cute, but upon closer inspection, the use of default Photoshop bevels, and poorly drawn paths take it down a notch or five.
User Interface
Next we’ll have a “look and feel” at the UI of each of these app and plug-ins. To quickly sum up, there’s a wide variety of quality, and you seem to get what you pay for to a degree.
Aperture

Apple know a thing or two about UI design and it shows in Aperture. This is one nice looking piece of software. Overall, Aperture is tied for first with Lightroom for me in UI look and feel. UX (User Experience) is a different thing.
Capture One

I have a bit of a love, hate relationship with C1’s UI. When I first launched it I loved the dark UI and understated lines for histograms. At the same time, I hate that weird texture they have on the main title bar (rich corinthian leather, anyone?), and the icons are pretty gross with their drop shadows. Fortunately that main menu bar can be hidden, and that’s how I keep it.
Iridient Developer

Users of PTGui ought to be right at home with this software. The UI is decent, although not terribly exciting. They’ve been largely successful in using OS defaults. Fortunately it wouldn’t take a whole lot of effort to whip things into shape. I’m considering the modification of the Resource folder assets to make things look a little more how I’d like.
I should also note that when I say “they” I actually mean one guy doing this whole app by himself. That’s impressive.
Lightroom

Lightroom’s Develop Module
The second application tied for first place along with Aperture. Lightroom has the most in the right place by default, and the right amount of things that can be changed. Any quibbles I have come down to user experience.
Some people don’t appreciate Lightroom’s “module” approach, but for me it makes all kinds of sense despite only using Library and Develop. I can get to the functions I want in fewer keystrokes than other workflow manager/photo editors on the market, including Aperture.
LightZone

Editing in LightZone
Gah. It’s free and it shows. The UI is serviceable, but if it ends up delivering the best demosaicing algorithms, I am prepared for less than optimal image quality. No retina display support here on OS X, but the UI text is mostly, if not all system-based so it renders nice and sharp.
The UI consists of typical sliders, some buttons that don’t communicate what they’re for terribly well, and at least one unique “Zone Mapper“ feature.
LightZone, as of 4.1.0 beta 10 (beta 11 was released 3 days ago, and after I started this process), also has a number of problems on OS X. It launches in a window that’s 256 × 118 pixels in size, and it suffers from some pretty severe drawing issues. Both of which can be seen below.


We have a bit of a problem here
Nik

Nik Software’s RAW Presharpener
Google are making their way through the entire suite of their acquired photo-editing software. I have to admit I was pretty bummed when I heard Google had bought them. I really like Colour Efex, and Silver Efex can deliver some phenomenal black and white results.
As far as we’re concerned here though, their RAW Presharpener and Output Sharpeners haven’t been updated for retina displays just yet. Otherwise the UI is pretty great. Lots of sliders and the U-Point editing is something a really like.
OnOne Perfect Photo Suite 8

OnOne’s Enhance panel
More in the non-retina-optimized category. For what it’s worth, I tweeted them mid-August 2014 asking them about retina support and their response was “Soon!”
Pre-publish update: OnOne just announced version 9 of the Perfect Photo Suite and confirmed retina support. They also claim a 30% bump in performance. We’ll see.
The UI is nice enough and skews towards lots of one-click fixes with fine-tuning available for those interested.
PhotoNinja

PhotoNinja’s Editor
This is a weird one. It looks ok, although it’s a pixelated mess from top to bottom on retina displays. Then there is the bizarre inclusion of the time in the UI. Not the capture time of the photo you’re working on, the time like, what time it is right now. I guess this is for when you switch the non-standard implementation of full screen mode on.
PhotoNinja allows for whatever panel you want hidden to be hidden which is nice.
UPDATE: On February 27, 2016, PictureCode made a pre-release of Photo Ninja (version 1.3.1b) available with full retina support, and proper full screen support in OS X.
User Experience
Perhaps more important than how something looks is how little the design is noticed. We all want something pleasing to look at to varying degrees, but a good user interface should get out of the way and let us work. It’s a really tough balance to strike.
It’s also important the software fits with your operating system. Too many devs try to reinvent the wheel so to speak, and refuse to implement OS-level defaults for one reason or another.
Finally, two of these applications are “destructive” editors. OnOne, and Nik are applications that create PSD, TIFF, or JPEG copies from RAW data for editing. This means that ideally you’ll want to use them in combination with a non-destructive RAW editor.
Aperture
Despite being around a month longer than Lightroom, Aperture has only made it through 3 major releases. Apple’s slow development of Aperture has caused many users to abandon the software before Apple announced they’d be discontinuing the software. The software still runs though, and it supports every camera Fujifilm have on the market as of this writing so it has every right being in the comparison.
The User Experience can be excellent, but it requires some settings be fiddled with, and some patience while initial previews are generated. Even after tinkering, the application is still not the swiftest available.
A big beef with Aperture for me is that even though Apple obviously implement full screen support properly on the OS, the application’s menu bar is inaccessible whilst in it. I have other niggles, but for the most part, they come down to familiarity.
Aperture is an all-in-one solution, providing users with photo management and robust editing.
Capture One
Lightroom’s relatively weak handling of RAFs lead me to start my search for alternative editors. I’d always heard that Capture One was at least a couple steps above Lightroom, and I probably would have bought it much sooner if Fujifilm’s in-camera JPEG rendering wasn’t so outstanding.
Capture One is another full featured photo management and editing platform. Of all the alternatives I’ve turned to, Capture One has felt the least alien to me. With that said, the vertical scrolling browser window takes some getting used to, and Phase One desperately need to add a simple way of seeing a “Before” view of our photos. Edit-by-edit doesn’t cut it.
Full screen support is implemented properly, but the menus automatically hide and show themselves. I’d much rather choose which menus are shown while still using every last pixel of my display.
The joke around the commercial photography industry was how unstable Capture One was. I witnessed some pretty spectacular crashes firsthand while on set. Fortunately they seem to have moved past those days as I’ve found Capture One Pro 7 to be perfectly stable since the day I downloaded and installed it. At times it has hung while rendering a ton of previews (like, thousands), and OS X will actually show the application as being unresponsive, but sit tight and wait it out. Capture One will muscle through and come out on the other side. Once previews are generated the application is quite fast, and it’s been very stable for me.
Iridient Developer
I heard about Iridient (not IrAdient) Developer on Twitter some time ago. I couldn’t get past the icon and the UI at the time, but Iridient Digital have made some improvements on the UI front. Full screen mode works the way it should, although it would be nice if the panels didn’t float above the photos, and could be docked into the interface. I also love the how Curves work, but it would be great if there was a histogram within it.
Beyond that, I really like the simple “In -> Out” workflow they have established. It’s a decidedly geeky application in the best possible way, but it can be used after a pretty gentle learning curve. Profiles can easily be set and applied to every photo you bring into it.
Images do need to be brought into Iridient Developer, so you’ll likely want a standalone photo management application.
Lightroom
I’ve been using Lightroom since the very first public beta. It’s always just worked for me. It helped in the early days that I always had Photoshop close by for Curves which were absent from Lightroom for far too long.
Lightroom is a full-fledged photo management and editing solution. You could easily get by without ever having to use the “Edit-in” function. There’s a reason “Live in Lightroom” became a saying. However, Lightroom’s extensibility and popularity are two of its greatest strengths. There are an astounding number of presets and plug-ins compatible with the software. For the last couple of years I’ve been doing all my organizing and preliminary editing in Lightroom, and a lot of my creative processing in Nik’s Colour Efex. Images move back and forth from Lightroom seamlessly.
It’s unfortunate that the perception among Fuji shooters is that Adobe’s demosaicing of X-Trans files is weaker than other RAW converters available. This could relegate Lightroom to being an asset manager for some. Others might still use Lightroom to do their creative editing, but if Photoshop is also available on your machine and it’s a learning curve you are up for, there’s a lot more power under the hood of Photoshop.
Lightroom has a full-screen mode, but it’s not the proper OS implementation so using Mission Control in OS X doesn’t work properly and I can’t gesture to, and from Lightroom as easily. As a top tier software maker, this is the sort of thing Adobe should be on top of.
LightZone
I have to honest here, I plan on spending as little time as possible in LightZone. Get in, make an image look nice (as nice as possible anyhow), and GTFO. It has some interesting features, but it really looks like the definition of “design by committee” Yikes.
Nik Sharpener Pro
As mentioned above, I’ve spent a lot of time with Nik’s software, particularly Colour Efex. That combined with Lightroom for basic RAW editing and Nik Sharpener Pro for output sharpening makes for a very powerful photo editing solution.
In this case I’ll be cutting Lightroom out of the equation to see how one could get on with just Nik’s software and their RAFs. As standalone applications, Nik’s package is a little bit weaker. I’ll be cheating and adding Photoshop to my workflow, but it’s possible to get by without it. With Lightroom out of the picture, all edits become “destructive” meaning after the file is saved, that’s it. There’s no adjusting your file unless you go back to the RAF and start from scratch.
Nik employs U-Point editing which I love. I think it’s the best way to get great creative results, especially when localization of your editing is important.
OnOne Perfect Photo Suite 8
OnOne’s software is also “destructive” so after (slowly) generating a preview of your RAF, all your edits will be made to a PSD, TIFF, or JPEG copy. Oddly, layer support is only available in PSD, not TIFFs.
There aren’t any adjustments to be made during whatever demosaicing OnOne does. This means that what you get is what you get. It’s essentially the same as Nik’s “Pre” and “Output” sharpeners, only pre sharpening is handled in the “Enhance” tab of OnOne’s application and output sharpening in the “Resize tab.
OnOne has proper full screen support and a lot of their UI is retina ready, but critically, the image preview is not, making it really difficult to judge image output.
Ultimately I think OnOne and Nik are really competing with each other and overall, Nik have the more complete, up to date, and faster package. We’ll see if that change with Version 9 of OnOne’s Perfect Photo Suite.
PhotoNinja
PhotoNinja is another complete photo management and editing package complete with selects, ratings, and a pretty quick browser. I can’t help but feel the application just feels out of place on the Mac. The only app that feels worse is LightZone. *shudder*
I’m going to give my best shot at making it work though because I’ve been hearing very good things about it. PhotoNinja and Iridient Developer are dark horse up-and-comers in the RAW editing space, so, at the risk of sounding arrogant, I feel compelled to support them. That’s not to say you should use something that doesn’t work for you of course.
Finally, the window below popped up on my first launch of the software. A new highlight recovery engine is being developed for X-Trans first. That is very good news for Fuji shooters. Anything that’s developed for our favourite sensor first deserves our attention.

“X Trans only”??? Nice.
Image Quality
Ok, with all that user experience junk out of the way, it’s time to get into what’s really important; image quality. I plan to post as many samples as I have time for, but I’ll at least cover a variety of subject matter. I’ll compare the ”out of the can” results; meaning, how the image looks by default once imported or opened in the application. I’ll then spend a reasonable amount of time trying to get the image as optimal as I can, and compare those results. I won’t be going to the trouble of localized or creative sharpening for these tests so it’s entirely possible that where an image is optimal in one area, it may not be in others.
Again, I’m not an expert in at least half of these applications. This is meant to give you an idea of what kind of results you can expect with a small amount of investment, and whether the software is something you should consider for your workflow.
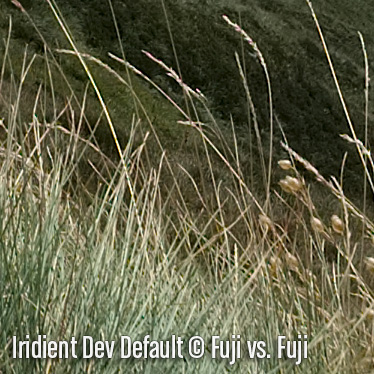
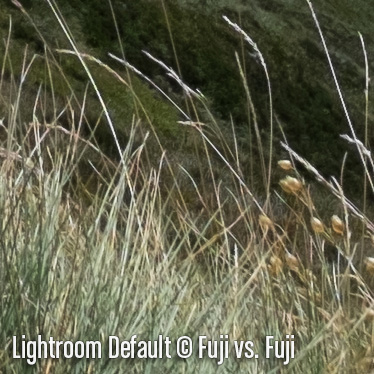
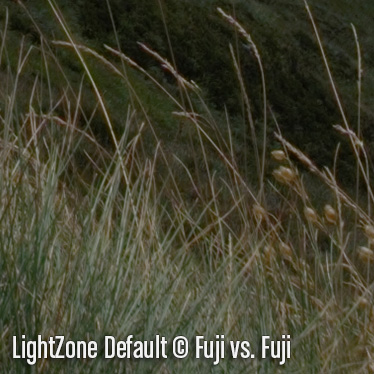
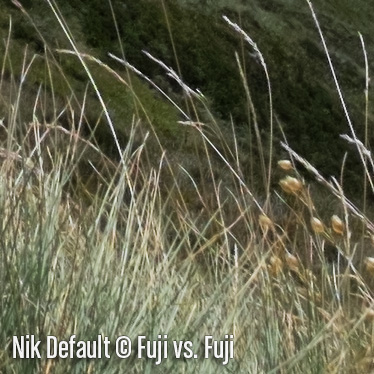
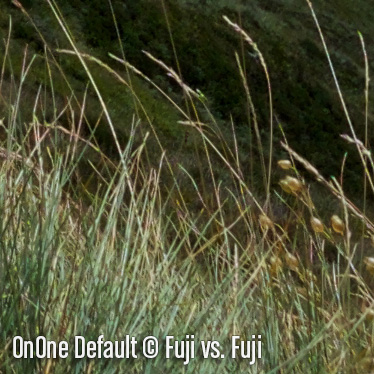
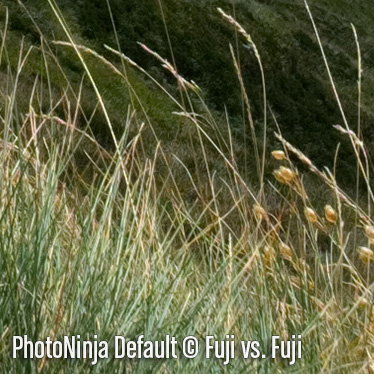
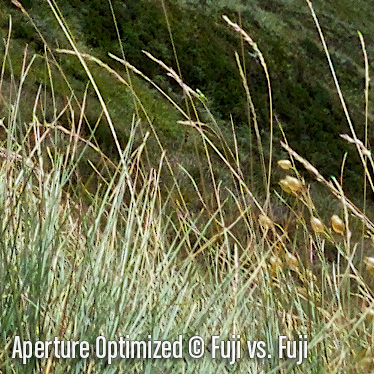
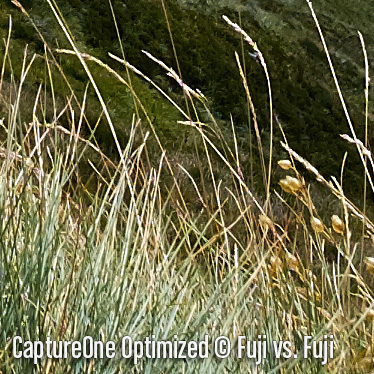
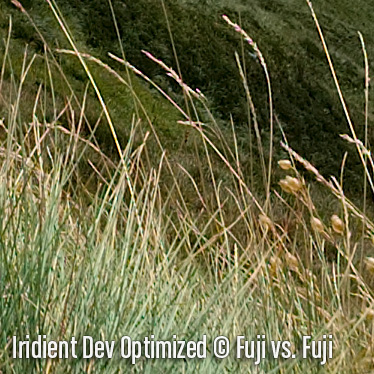
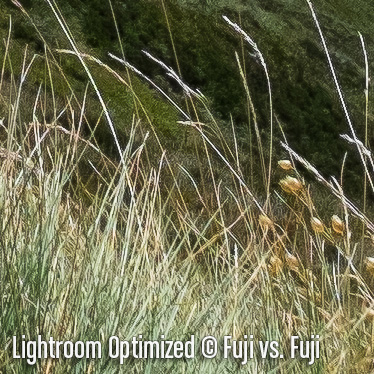
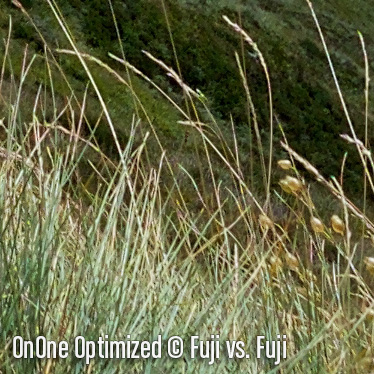
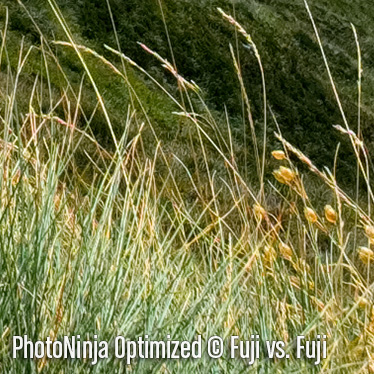
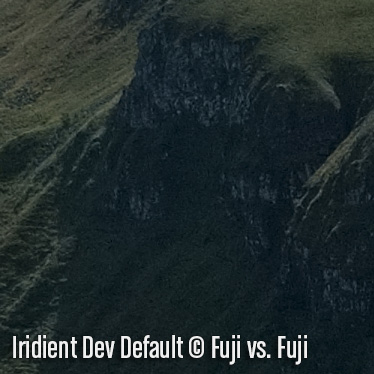
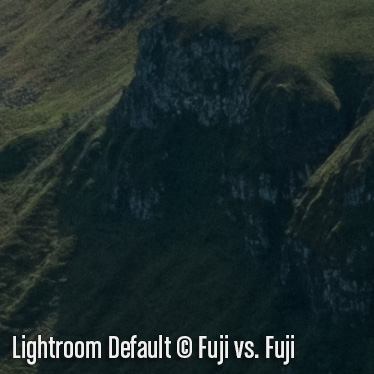
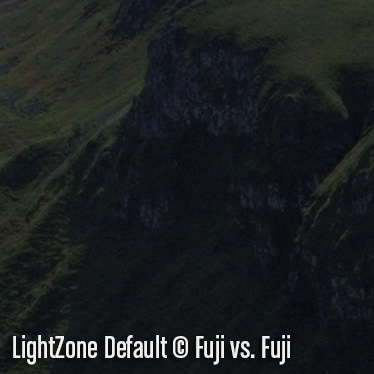
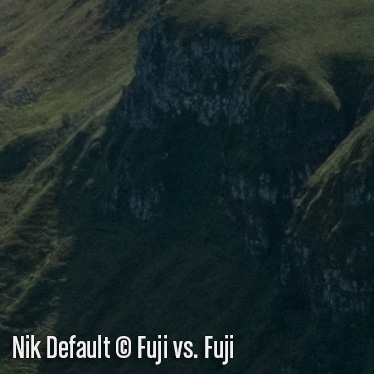
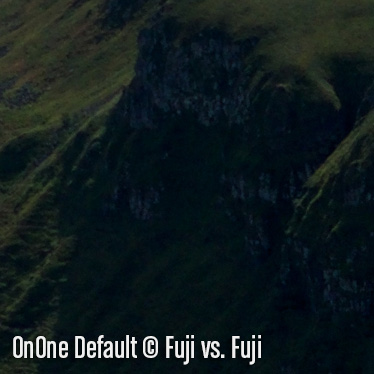
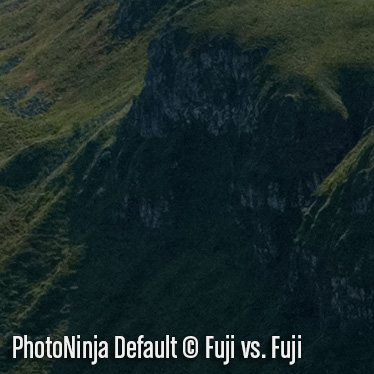
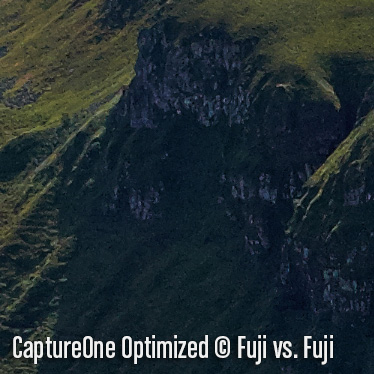
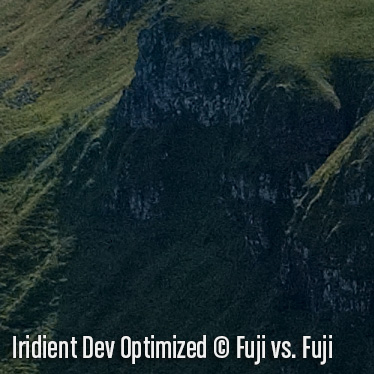
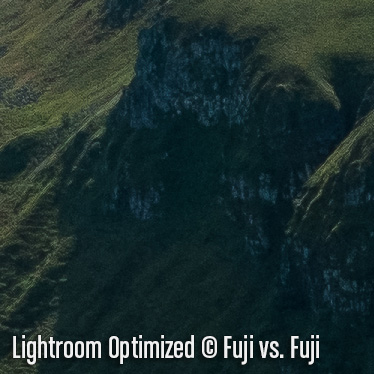
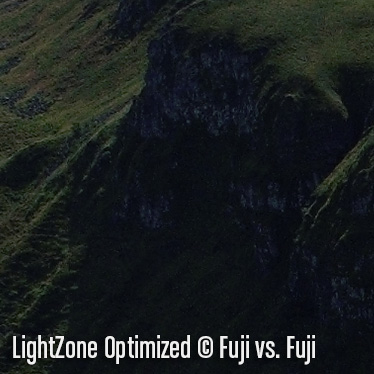
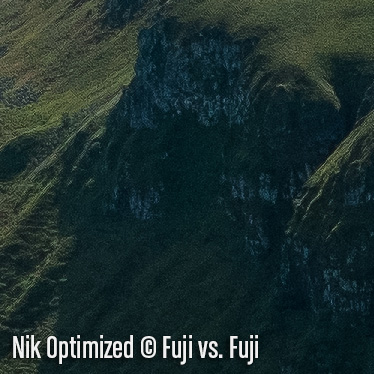
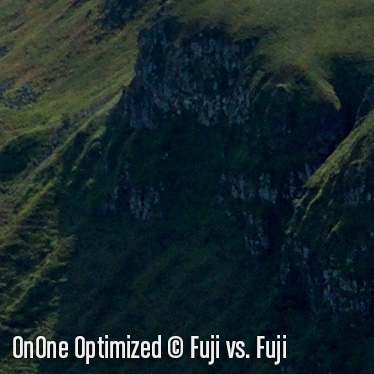
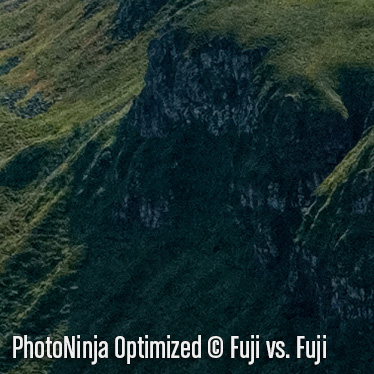
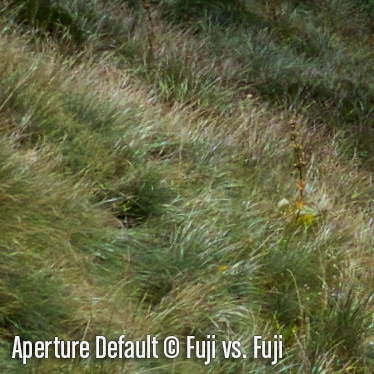
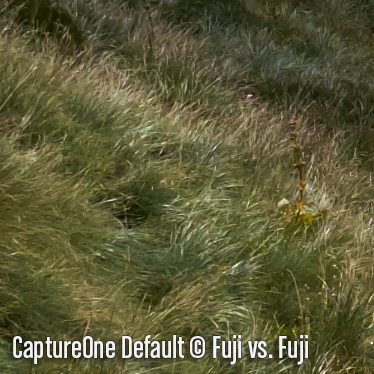
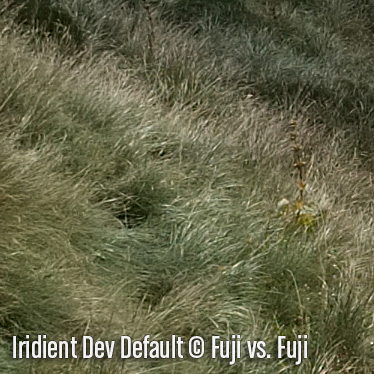
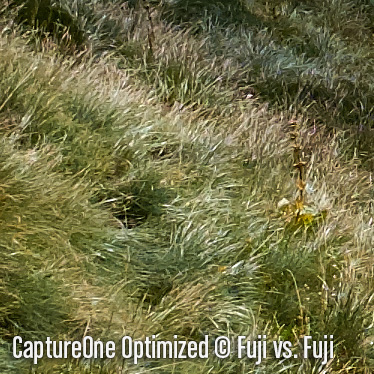
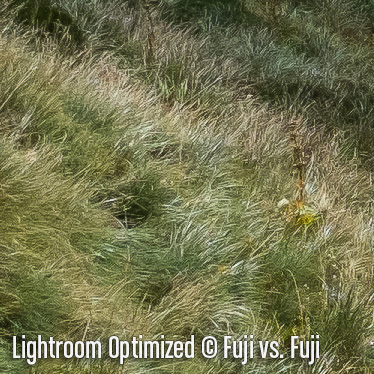
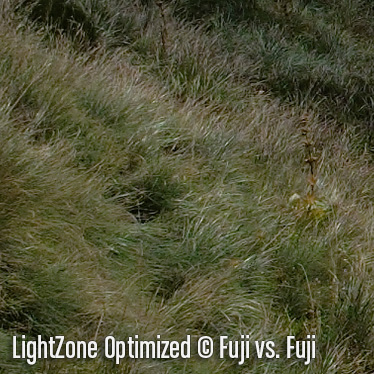
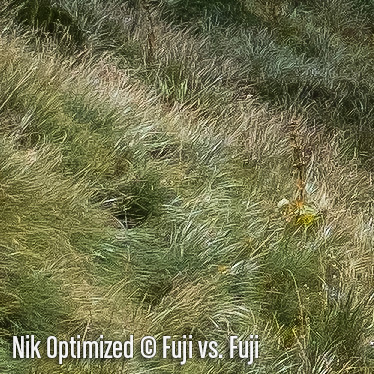
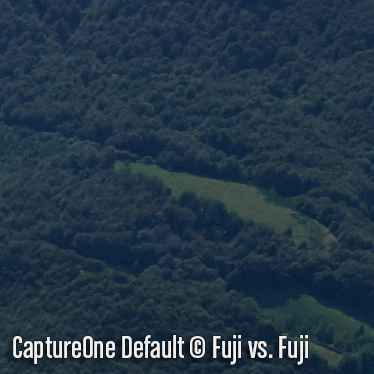
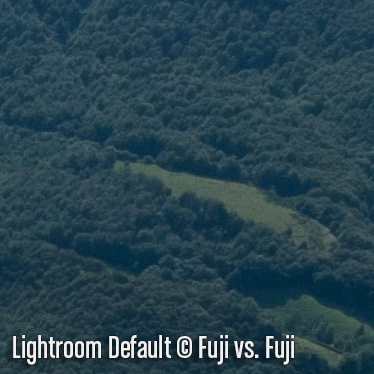
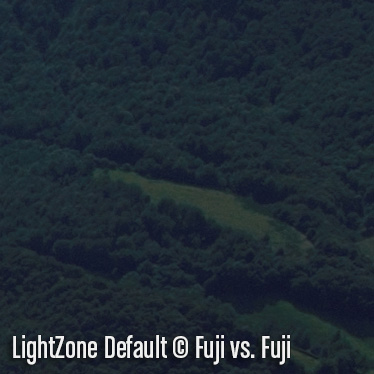
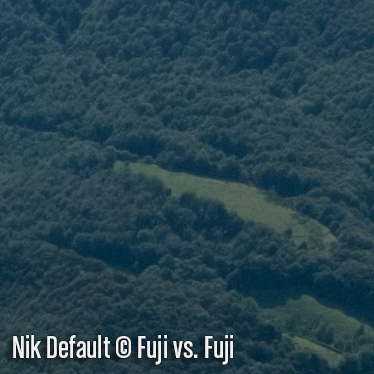
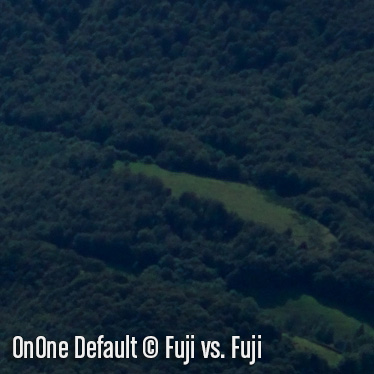
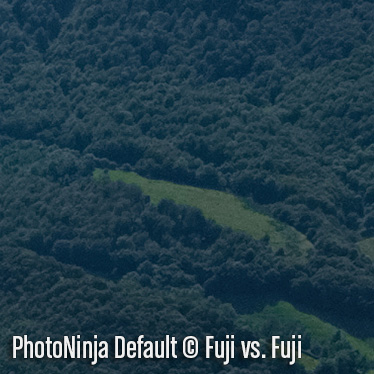
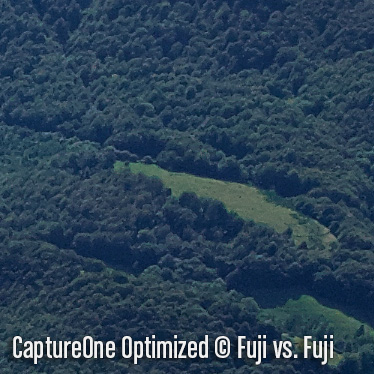
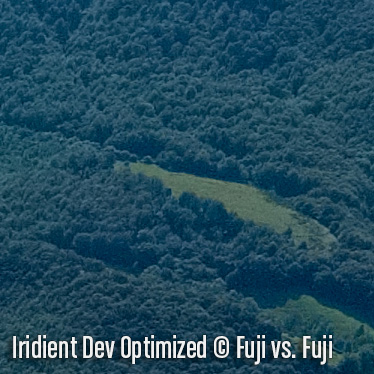
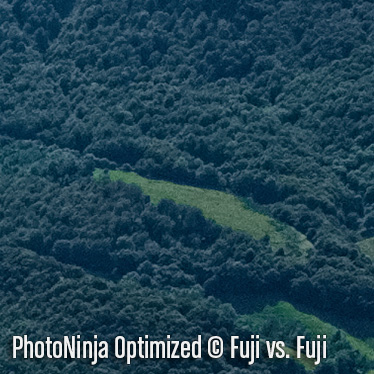
Landscape
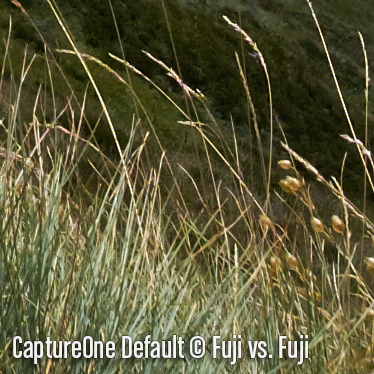
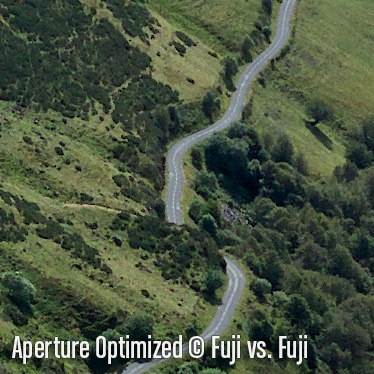
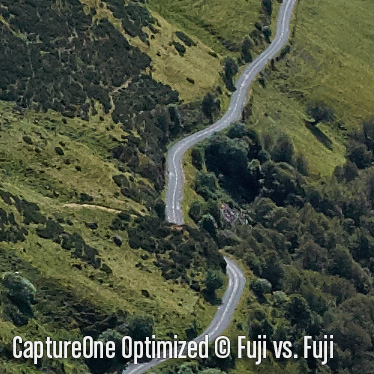
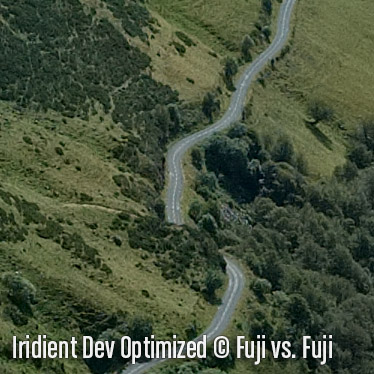
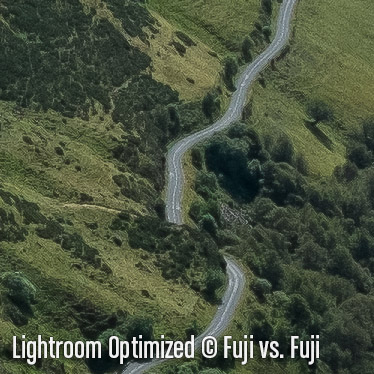
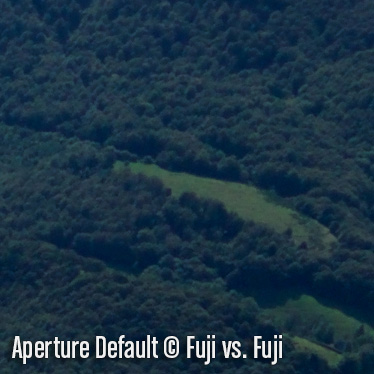
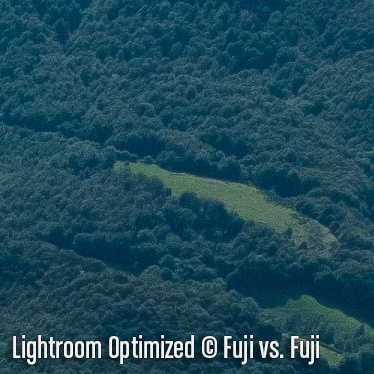
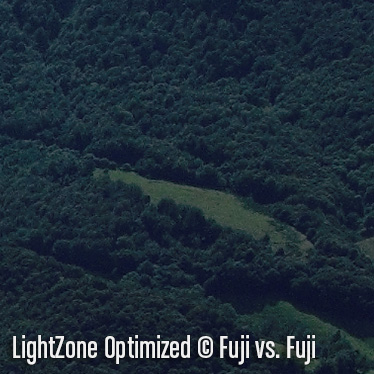
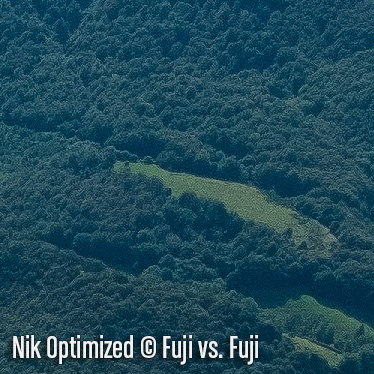
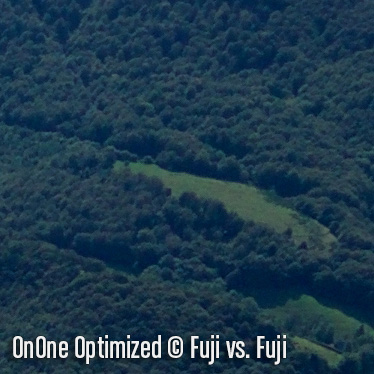
The first image selected is decently exposed (actually a little underexposed to preserve highlight detail in the sky) with only a small amount of black clipping. While aesthetically this isn’t a stellar image, the grass in the foreground, landscape in the middle ground, and distant trees make it a good test image. It was captured with an X-E1 and the XF 14mm f/2.8 at f/8 and ISO 400 (which the camera chose automatically to increase the Dynamic Range of the JPEG that accompanied this RAF. A Dynamic Range of 400 was also automatically chosen).
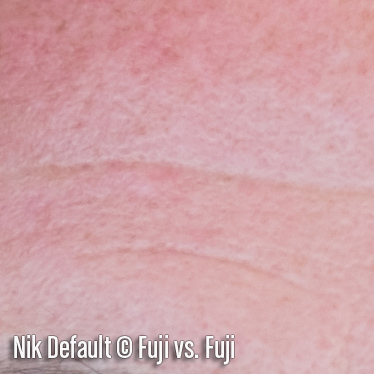
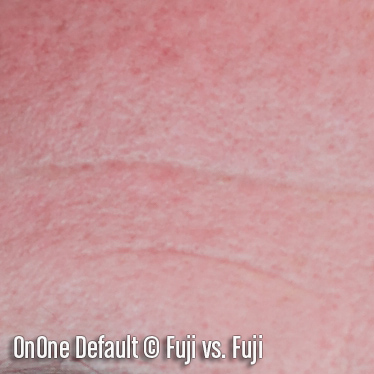
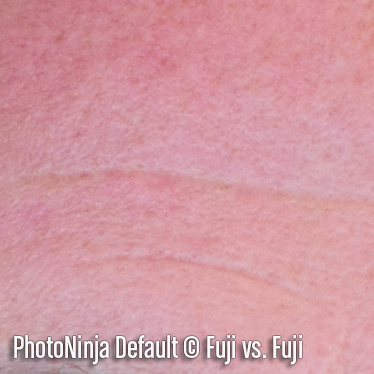
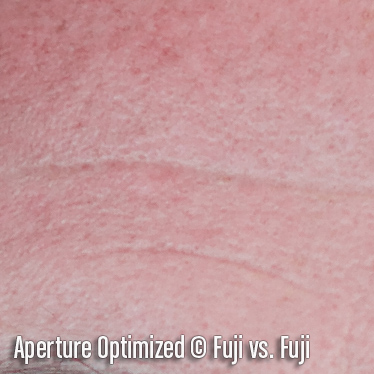
Keep an open mind. There are a lot of crops here, and it’s tough not jump to a conclusion after the first couple, but each area is handled by demosaicing algorithms quite differently.

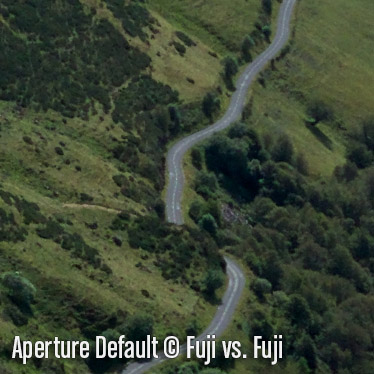
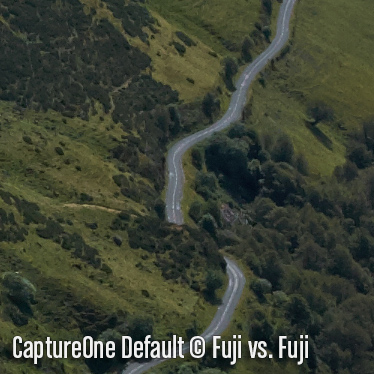
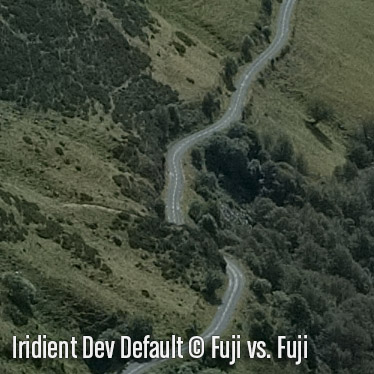
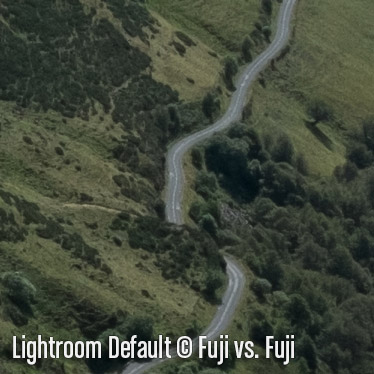
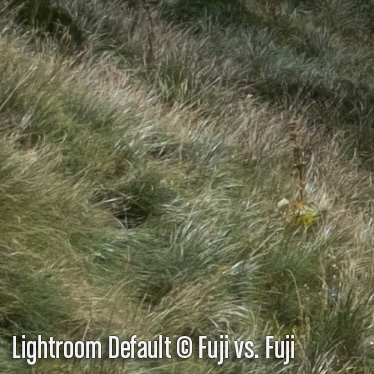
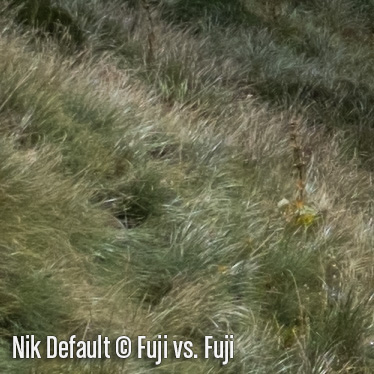
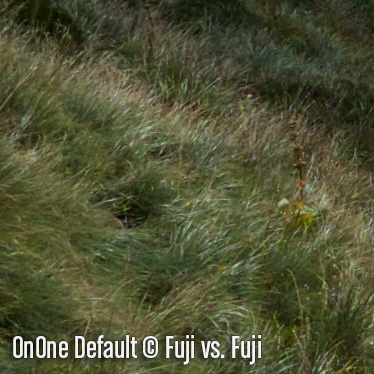
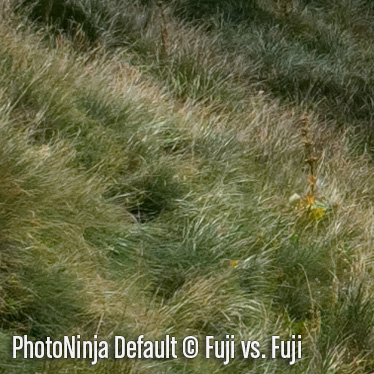
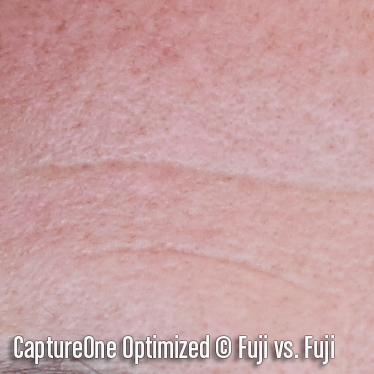
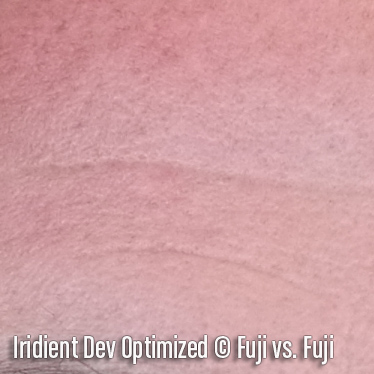
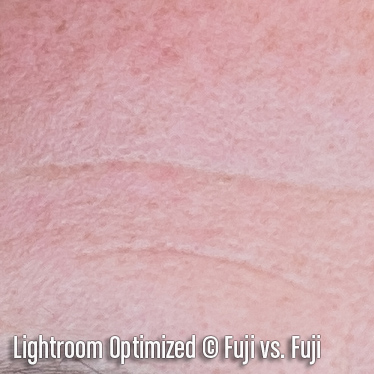
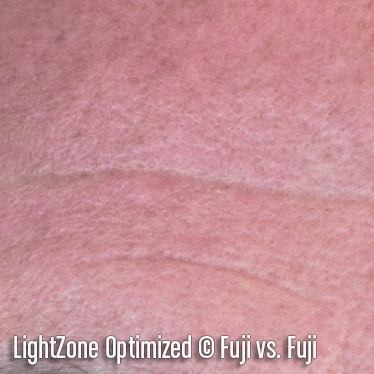
Sample landscape image processed in Lightroom
Foreground Grass


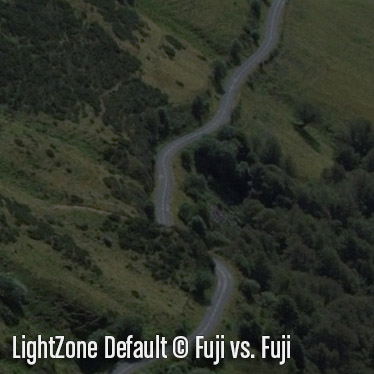
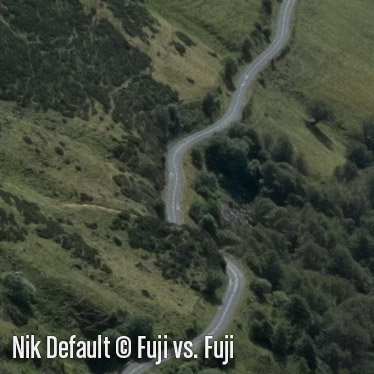
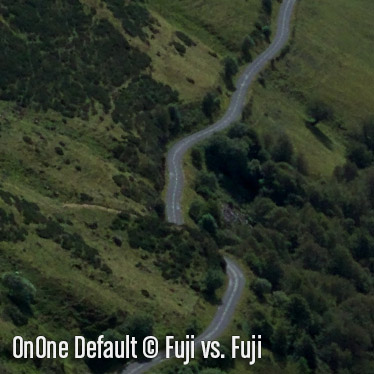
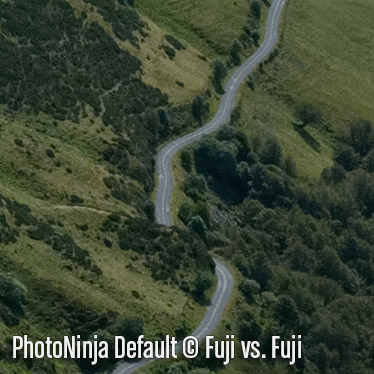
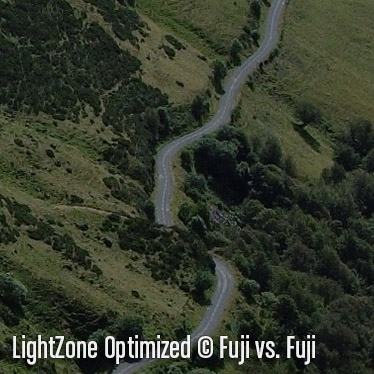
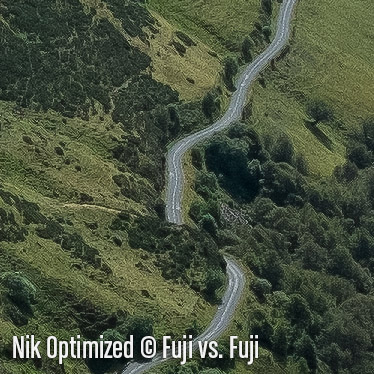
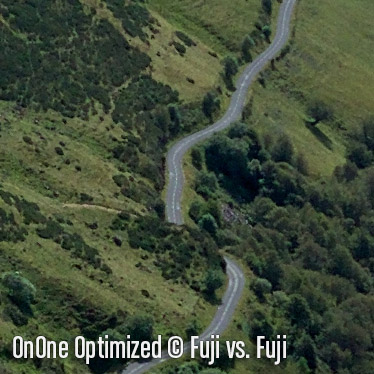
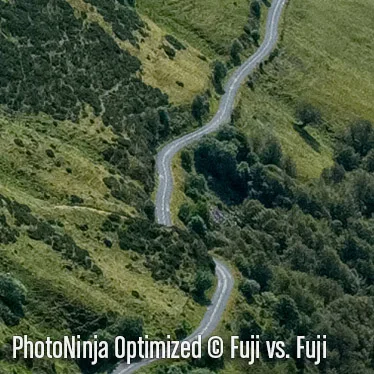
Winding Road
Shadows


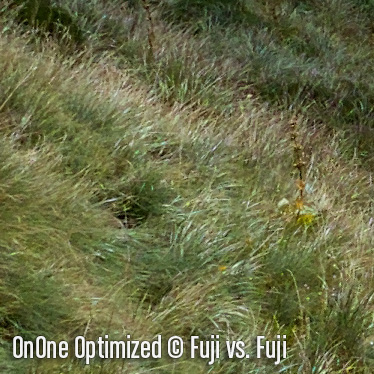
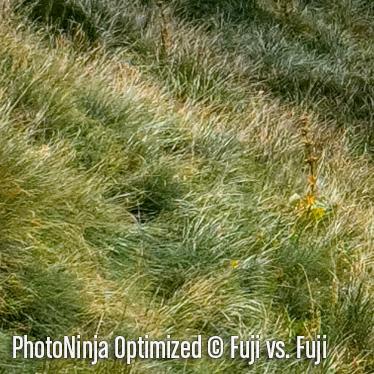
Fine Grass Detail


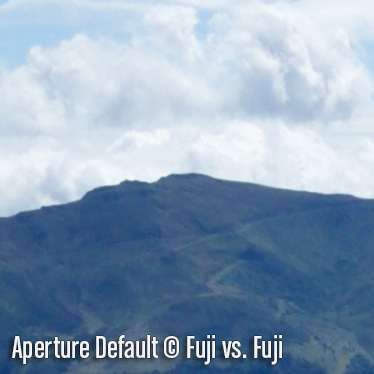
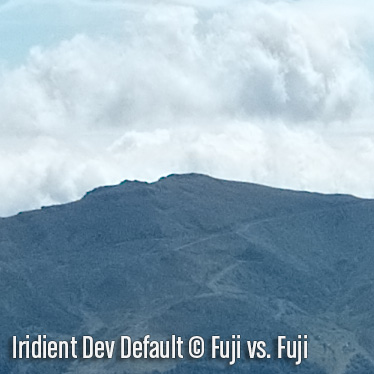
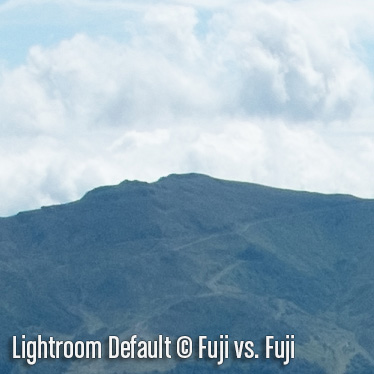
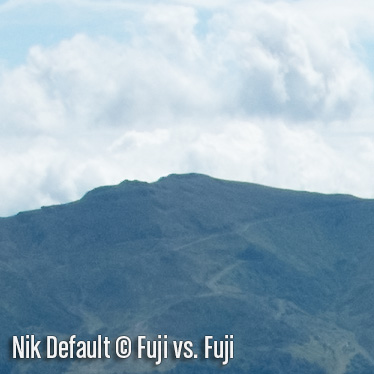
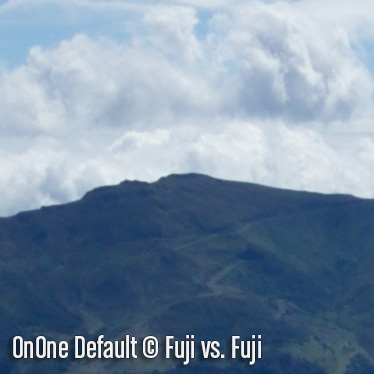
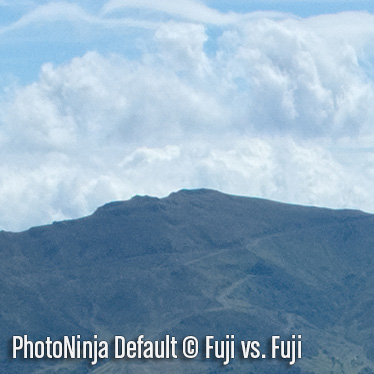
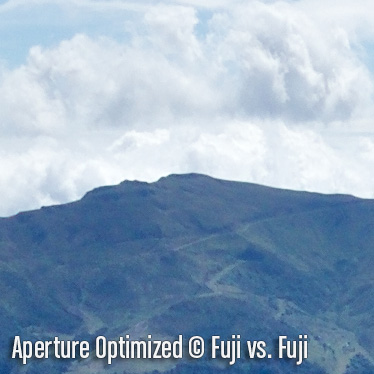
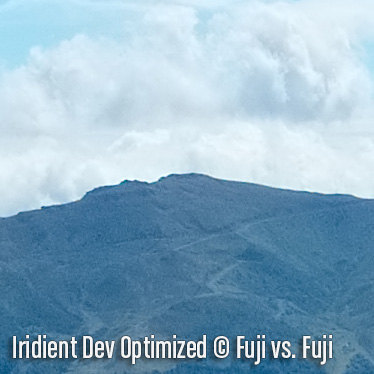
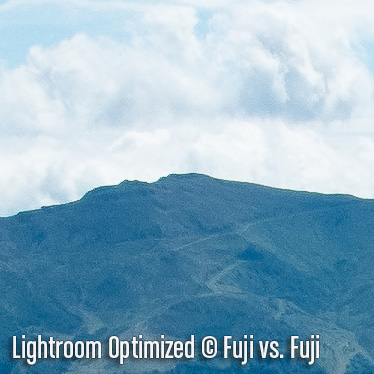
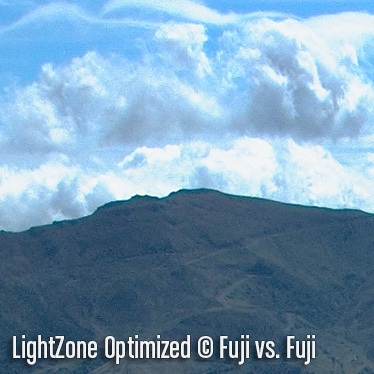
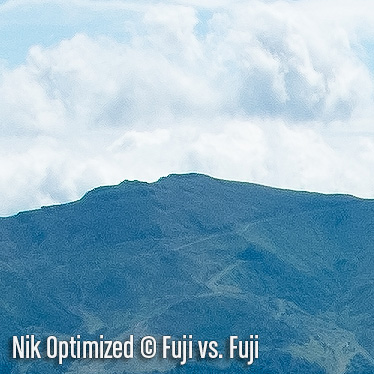
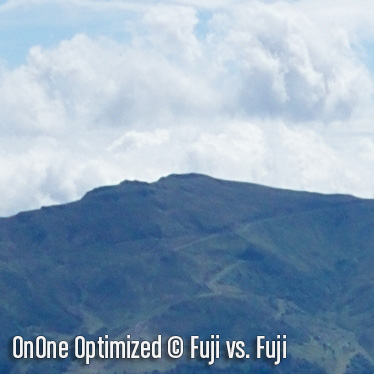
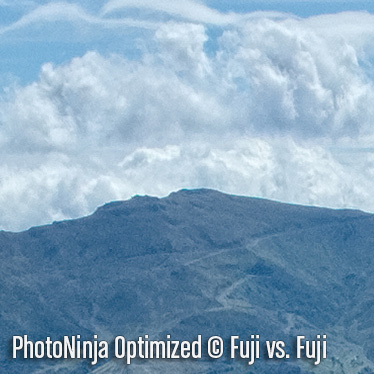
Distant Mountains and Clouds


Distant Trees


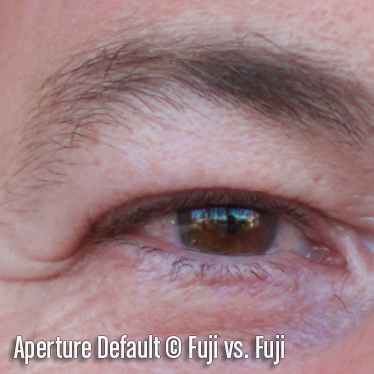
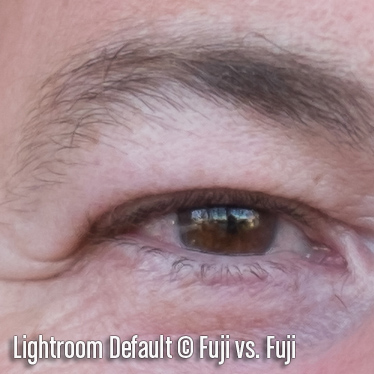
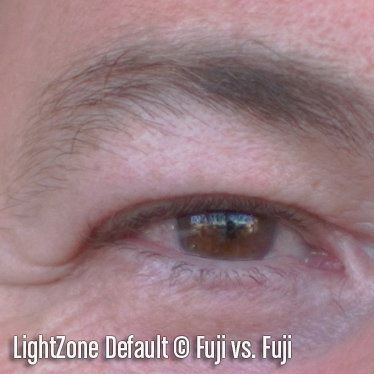
Portrait
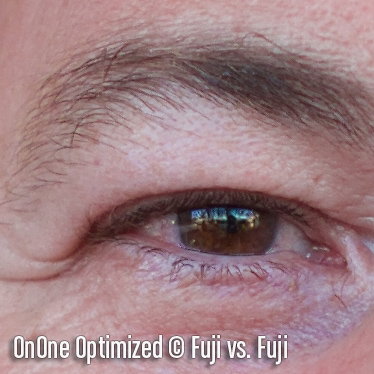
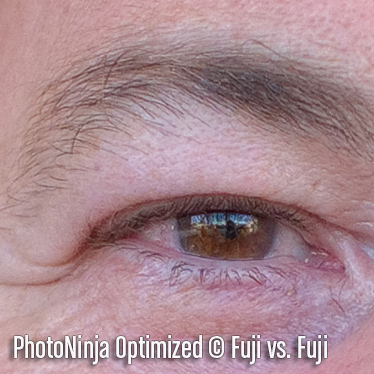
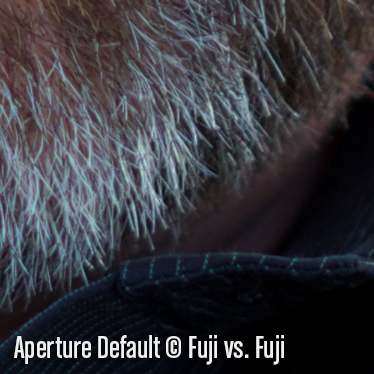
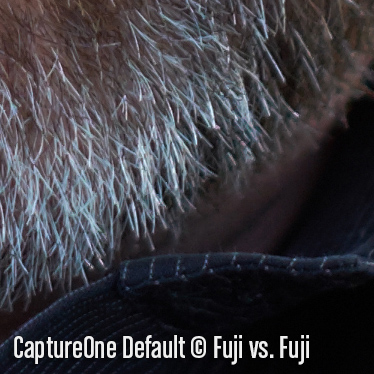
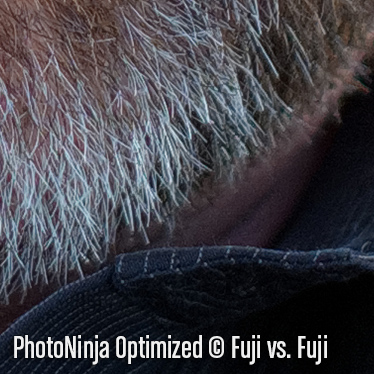
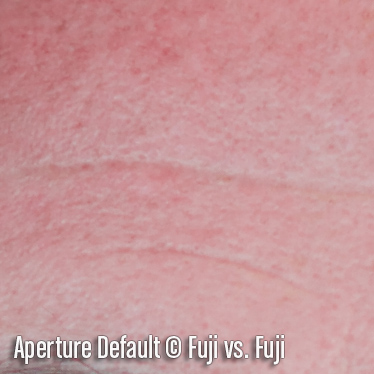
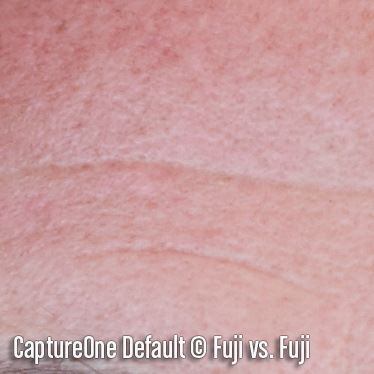
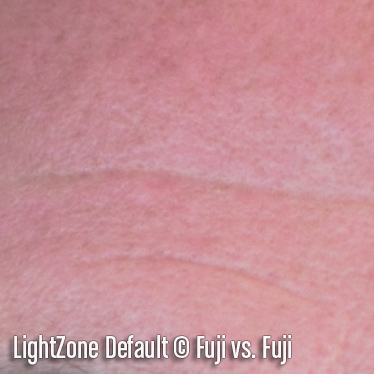
Next up is casual portrait of my buddy Craig. His eyes are nice and in focus, but his beard, skintone and the out of focus bits in the background are good to compare. This image was shot with an X-T1 and the XF 23mm f/1.4 at f/1.4 and ISO 200. No skin smoothing has been applied, but “Portrait” specific settings were chosen (for example, PhotoNinja’s Colour Enhancement Base Style), and where possible, very mild skin tone correction was applied.

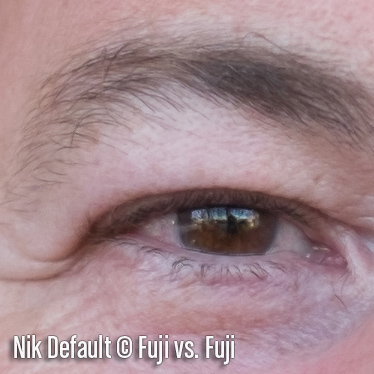
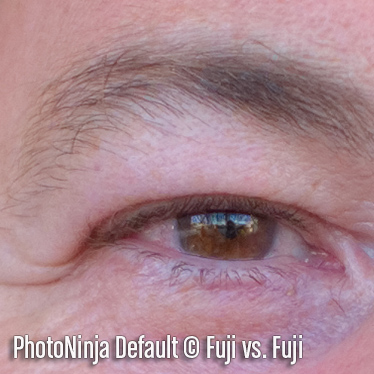
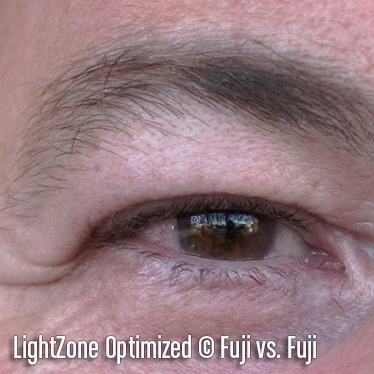
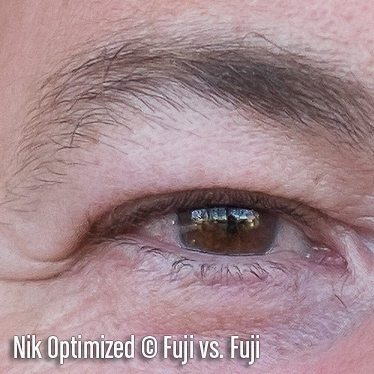
Eye


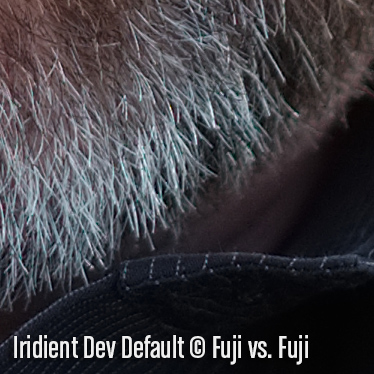
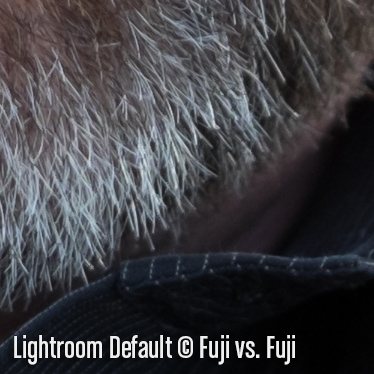
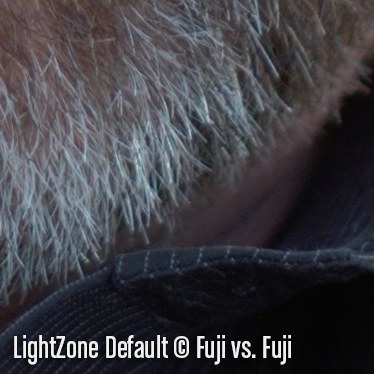
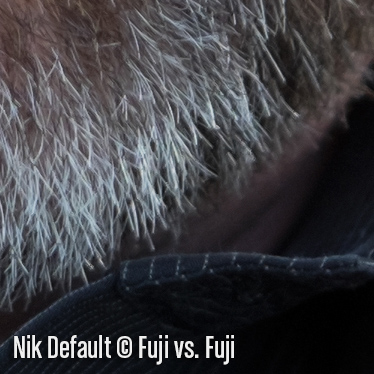
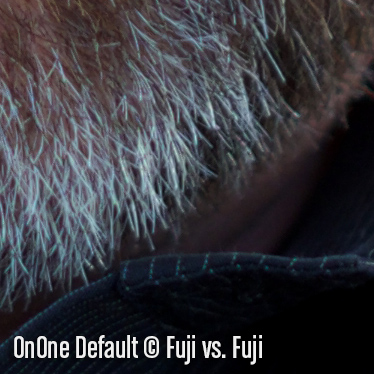
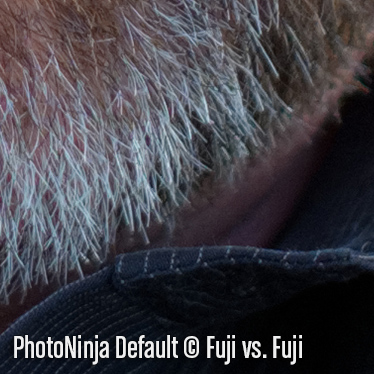
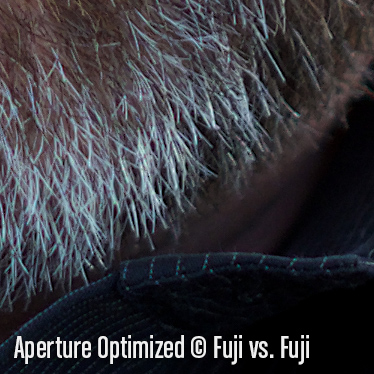
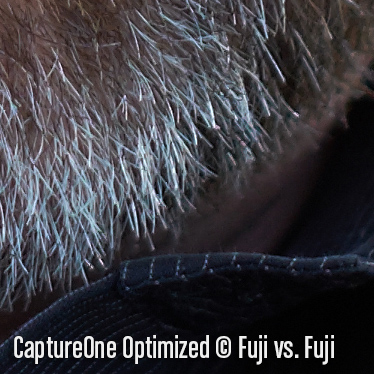
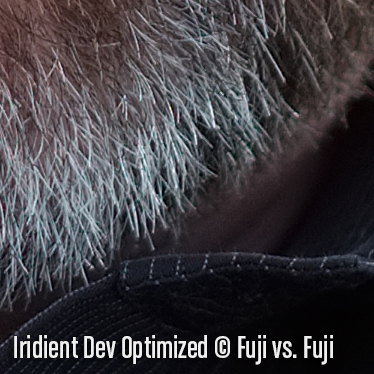
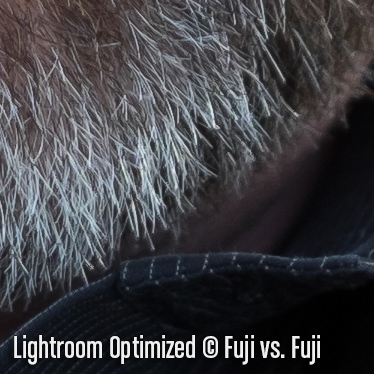
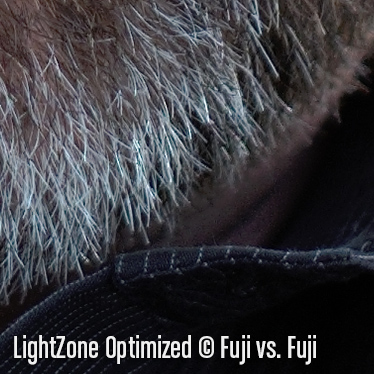
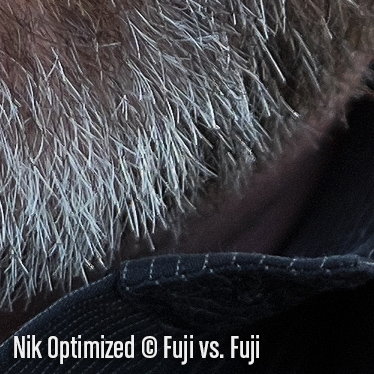
Beard

Skintone


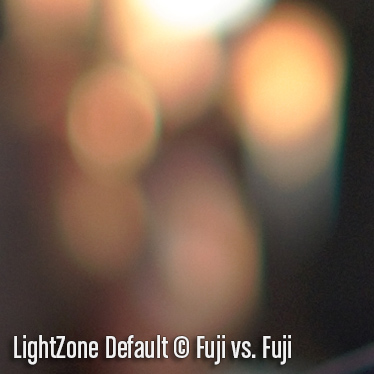
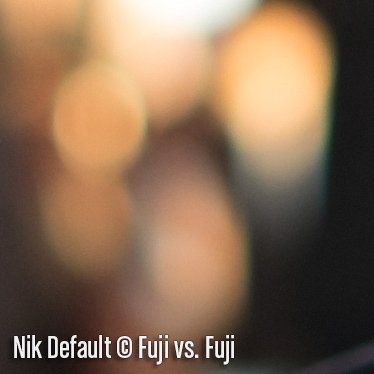
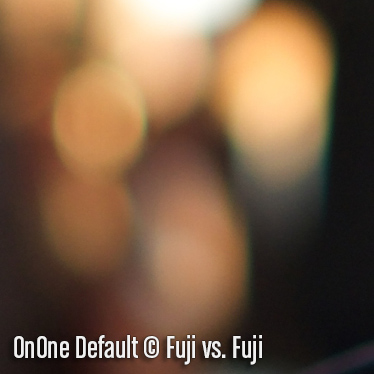
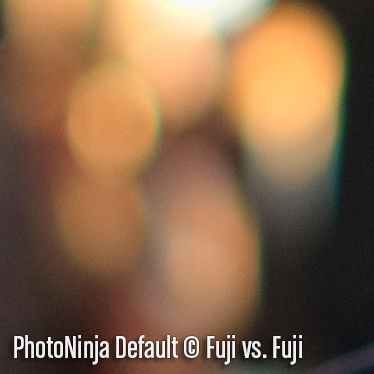
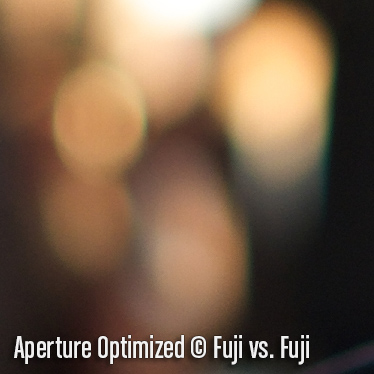
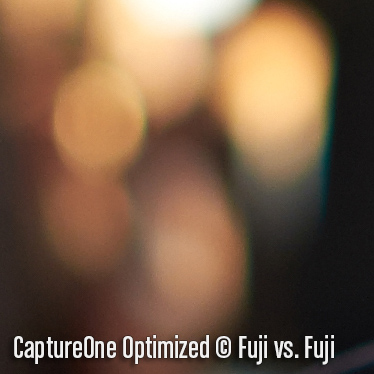
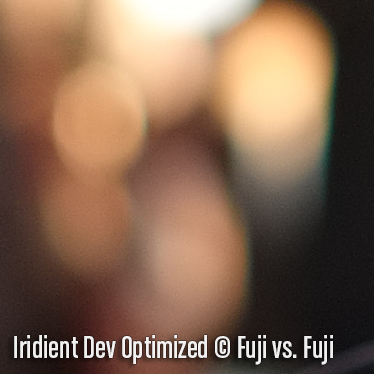
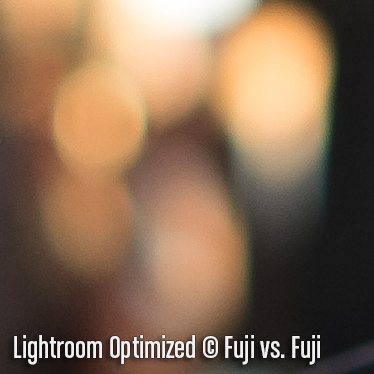
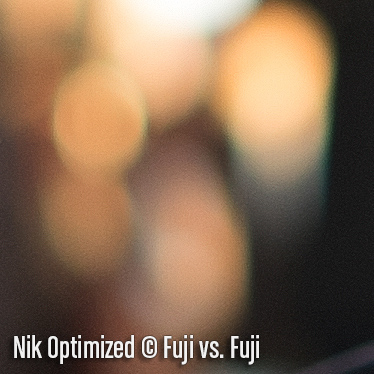
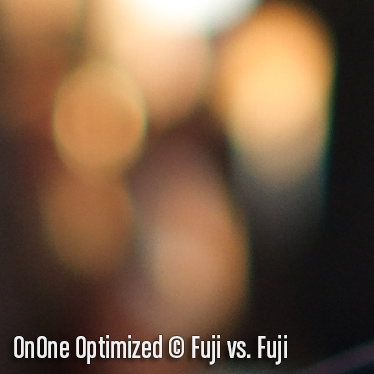
Bokeh


Analysis
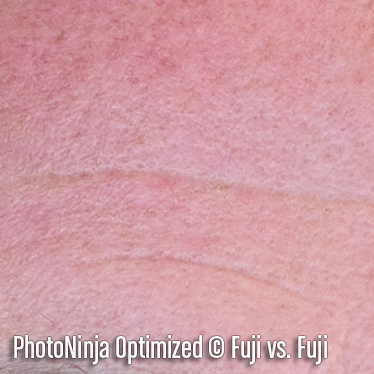
The first thing that jumps out at me is PhotoNinja is not optimized for portraiture. It does wonders with fine detail like whiskers, but for things like skin tones and eyeballs you’ll definitely want to make some adjustments. PhotoNinja also appears to be grabbing onto any noise that might be in the file as seen in the Bokeh! image. Iridient Developer is guilty of this too, but to a lesser degree. Of course PhotoNinja has Noise Ninja built in which is what PictureCode were previously known for. I haven’t done much of anything in the way of noise reduction beyond the defaults in these images.
For each of these converters I did some minor colour correction on the skin tones, pulling back some of the red that they all pushed a little to far. To my eye, Capture One lives up to its reputation of producing the most pleasing skintones by default. I think Phase One also have the most control in their software to fine tune skin tones to get them looking great.
LightZone once again isn’t great by default, and those screen redraw errors I mention up there are actually file read errors, but LightZone holds its own in the optimized file, particularly with the eyes and the beard.
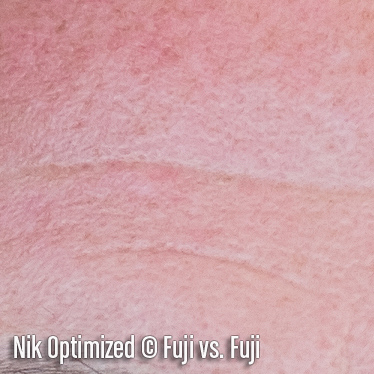
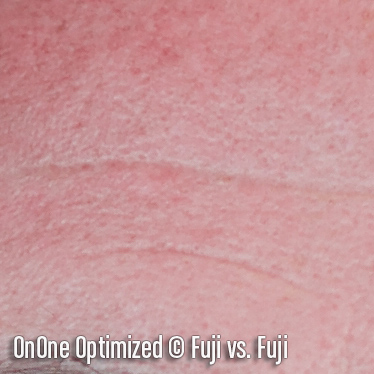
When it comes to the desctructive editors, Nik once again mops the floor with OnOne. If you’re looking for a dedicated output sharpener, Nik has the stronger, simpler software.
Evolving Conclusion
I think it’s pretty safe to say that “out of the can,” Irident Developer produces the sharpest, most detail-rich images from X-Trans sensors. It’s actually pretty astounding. The developer seems to have figured out just the right amount of sharpening to apply to his demosaicing algorithms. I can’t believe this is one guy (with a little help from the open source RAW decoding program, dcraw).
If you’re a Photo Mechanic or Bridge user on OS X, and you want the most acuity form your images with essentially zero effort, you’d be crazy not to take a long hard look at Iridient Developer. It’s fast, delivers excellent image quality, has the right controls, and the right level of fine-tuning. It could use a few usability tweaks and maybe a visual upgrade here and there, but the software is in very active development so perhaps those tweaks aren’t too far off. At $99 USD, it’s a steal.
PhotoNinja is the runner up as an out of the box solution in terms of detail. I think I prefer the default colour rendering of PhotoNinja as well. There’s a richness and depth to it that’s only exceeded by Capture One, in my opinion. PhotoNinja is $29 more expensive than Iridient Developer, but does offer a more complete photo management solution. However, it is still a pixelated mess on retina displays, and while it looks like a bit more detail can be pulled out of images with minimal editing, it also does some weird things to more delicate details like clouds. I’m also not convinced that the same results couldn’t be achieved with Iridient Developer with a bit more fine tuning.
Aperture, Capture One, and Lightroom are all weaker performers by default compared to Iridient Developer when it comes to detail, with Lightoom being the worst. The trouble with Iridient Developer is it has a tendancy to sharpen noise, which is not something we want. PhotoNinja is even worse for this. These apps are made for extracting and preserving detail. Capture One also has a “Structure” and a “Clarity” slider in addition to sharpening whereas Aperture and Lightroon only have “Definition” and “Clarity,” respectively.
I find myself preferring the rendering of Capture One better over all. It’s tough to put my finger on. Some of it is colour rendition, some of it just how the details are handled. When viewing the whole image Capture One stands on its own, and is the image I most want to look at. The others have a harshness to them. This could probably be neutralized by fiddling with settings, but Capture One gets there first. PhotoNinja is actually the closest in terms of definition, but the colours aren’t as nice. Irident Developer has the second most pleasing colour, but the images are a little bit flat after only minor tweaking, and look like they need a midtone contrast bump. This might be exactly what you want though. If you’re interested in having a detailed, but otherwise neutral image to pull into another creative post-processing application like Photoshop, Iridient Developer works great.
Coming back to Aperture and Lightroom, I ended up pushing Aperture a little bit harder in the sharpening as it seemed strangely soft on my first attempt. It now looks a bit sharper than Capture One, but I had the sharpening settings nearly maxed out. I’ve been finding lately that it’s best not to push Lightroom much past 60 in sharpening as it tends to generate what looks like false detail in areas like the distant hills. Masking can help, but it’s an all or nothing setting, which isn’t what I want. In general it’s just a little big weaker than Iridient Dev and PhotoNinja. I think I’ll be moving away from Lightroom when it’s time to process a RAF. I’ll still keep it as my photo management software for now, but for RAW files I’ll turn to either Capture One or Iridient Developer. For a singular photo management and RAW converters application, I think Capture One is the most complete package.
UPDATE: It’s become common knowledge that Lightroom handles RAFs best when liberal use is made of the “Detail” slider with more moderate adjustments applied to the “Amount” slider. This is true, but don’t expect miracles. As we’ve seen in my comparison of Lightroom 5.7 and 6.1, the more recent versions of Capture One and Iridient Developer still outmatch Lightroom in the arena of detail extraction.
LightZone in particular, and even OnOne’s Perfect Photo Suite 8 are poor enough that I may leave them out of follow up comparisons. The open source devs of LightZone are probably focused on Bayer sensors for now, and that’s fine, but it does mean that for X Trans sensors, the results aren’t good. Don’t even bother registering to download it.
Hopefully OnOne will get better when version 9 hits in October. For now, Nik is by far the stronger of the two destructive editing options. Their interface is better as well, and if you buy their whole suite of plug-ins, you get the fantastic Colour Efex and Silver Efex. It’s a pretty good deal, and something that wouldn’t be bad to have for creative post processing after one of the other RAW converters works its demosaicing magic.
If you’ve found this review helpful, please consider using or even bookmarking one of the affiliate links below for all your shopping needs. Your prices don’t change, but a small percentage of the purchase price goes to me and helps me keep testing. Thanks!