How I Packed for South Africa

Note: This post has been written over the course of a week, and partially during my trip with spotty access to WiFi, so it is not as clear or concise as I’d like.

I thought I was way ahead of the game, and that I’d have lots of time to get a few more prepping posts online, but busy times at work and in life resulted in my trip sneaking up on me.

As I sit in Schiphol airport waiting to connect to Johannesburg, I’m left with nothing but time to reflect and write about how things turned out. There’s been some pretty big shifts in my packing strategy since I last wrote about it, so I’ll try to do a decent summary.

Think Tank Airport Essentials

My Think Tank Airport Essentials arrived a few weeks ago. This bag has supplanted my Incase “DSLR” Pro Pack as my daily backpack for carrying my work essentials and some camera gear to work and home every day. I love it.

Unfortunately, despite my best efforts, there was no hope it was going to be enough bag for my entire trip, largely due to the longer telephoto lenses I felt obligated to bring. The amount of stuff I can get in this bag is incredible, and without those zooms,1 I could easily get two weeks of travel out of the Airport Essentials.

Baggage Claim

I sort of felt like I was failing here, but my wife and I resigned ourselves to having to check a bag each this time around.2 The varied South African climate we expect to face combined with family events we have planned means we need a lot more clothes than we’d typically pack.

Given the unique nature of this travel experience, and that we shouldn’t need to worry too much about moving our bags around,3 it makes sense to optimize for more gear, and that means another bag.

Briggs and Riley

As much as I wanted to tell myself that my Osprey Farpoint 55 S/M would be the last bag I ever needed, there is sure to be other travel occasions where carry-on-only will be less than ideal. Patagonia and New Zealand spring to mind. So I started looking into what an optimal piece if luggage would be. I wanted to stick to carry-on size regardless for when I might travel with just a carry-on, and a backpack wouldn’t work. The Wirecutter has a pretty great breakdown of carry-on luggage. They pick the Travelpro Platinum Magna2 22" bag,→ but in my local currency, their “upgrade,” the Briggs and Riley Baseline International,→ is about the same price, making it the sensible purchase.

I might do up a more in-depth review of this bag as it relates to travel/adventure photography one of these days, but having packed and unpacked it a number of times already, I can say the quality is excellent, and the compression system is everything it’s made out to be.

Back to Camera Stuff

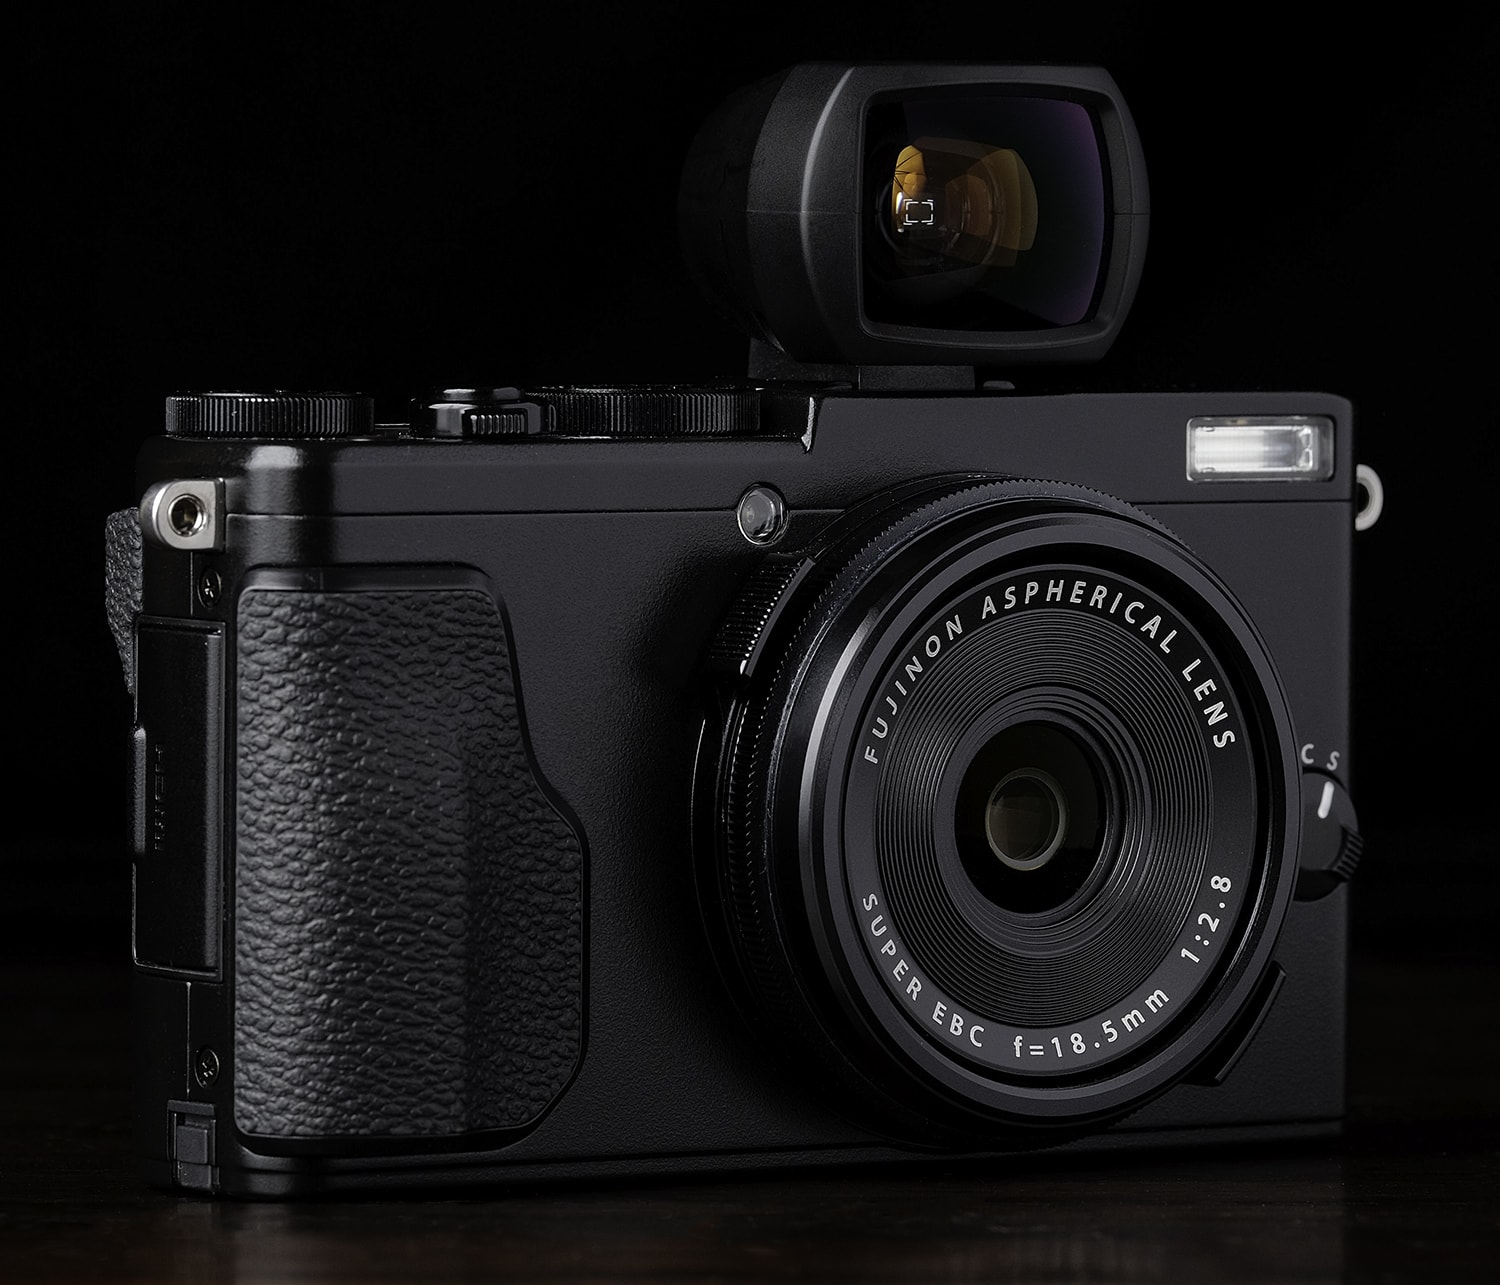
With my Think Tank bag freed from having to accommodate clothing, I found myself with much more space available for gear. I decided to give myself permission to really gear up for this trip. That means both the XF 50-140mm F2.8 WR and XF 100-400mm F4.5-5.6 WR have come with me, along with the 2× teleconverter to get me as close as Fujily possible to the indigenous fauna. Since I had the space, I decided to chuck the XF 10-24mm f/4 in for good wide measure.

It’s Heavy

My camera gear selection is as follows:

Bodies

Lenses

Support

Other

I haven’t carried this much photographic equipment since the first time I travelled with my D300, when I though it was a good idea to bring everything I owned.4 For such a big trip that has so many different photographic opportunities, it made sense to err on the side of too much, rather than too little.

Perhaps I could have gotten away with leaving the XF 16-55mm f/2.8 WR or XF 10-24mm f/4 at home, but I have used both already, and you’ll note that one lonely lens is missing those two magical initials, “WR.”

My South African family has let me know that, despite the current drought, Cape Town can be quite rainy. This is a place I’m going to want to do some landscape photos. Sure I could get by with my XF 16mm f/1.4 WR, but if I can get myself the flexibility of a zoom lens, I figure I might as well. And that way, if we do find ourselves in heavy rain, I can keep lenses on bodies and not worry about having to change them. Once again, that lack of WR on the XF 10-24mm f/4 is hurting me. Had the 10-24mm been weather sealed, I would have only brought it and not the 16-55mm.

Had I been packing “normally,” three of those lenses and the teleconverter wouldn’t have even seen my bag, but there’s a good chance I won’t be back to South Africa for quite some time, if ever, and since we’re being driven around, I have the luxury of leaving what I don’t need in my hotel room, or on the bus. More often than not, I’m carrying my Billingham Hadley Small.

Additionally, if this was exclusively a “Safari” vacation, at least two lenses could be left out, and maybe even the tripod, depending on the camp.

Straps

I decided to keep my green Artisan & Artist strap on my X-Pro2, and affixed the replacement Loop 3 the guys at LumaLabs were kind enough to send after my first one frayed. The Loop is a strap I typically only use during extended periods of shooting like on vacation—for which it is outstanding—so this is a perfect opportunity to double check the strap durability. I’ll update the review post, but so far so good.

Memory Cards

Lexar is sorta scummy when it comes to the transfer speeds they list on their cards. They like to list a really fast read speed, which, when it comes to continuous shooting, is much less important. The write speeds are always much slower until you get up to their 2,000× cards, which are twice as expensive as their 1,000× cards.

Sandisk, on the other hand, has much closer figures for both read and write. The Extreme PRO cards→ that I went with have a listed read speed of 95 MB/s, and a write speed of 90 MB/s. I’ve hit the ceiling on the write speed quite a few times, but not enough for me to worry about spending the money for faster cards, and I've been perfectly content to just switch cameras for a different perspective while the buffer clears on the other. I went for 64GB cards, six in total along with a bunch of older, slower 32GB cards as backup. I seriously doubt I’ll touch those though.

Clothing

Your attire can often be almost as important as what camera you have. If you’re not comfortable due to the elements, sore feet, or an aching back, you’re much less likely to want to shoot. Quality footwear, and clothing that can keep you comfortable in a broad range of climates are invaluable. My wife and I have a bunch of merino wool clothing, largely from Icebreaker (although I would avoid their T-shirts which a very prone to developing holes),→ which has kept us warm in the frigid winter mornings without getting too hot too fast after the sun comes up.

Another major advantage of merino is it can be worn for days without smelling. This might not sound appealing from a hygiene perspective, but it’s been really nice pulling on a pair of pants or a hoody after sitting around a fire without it reeking of smoke.

In Closing

Well, this post has been in a constant state of revision, from past to present tense, before using any of my equipment to being done nearly all our game drives. I’ll be sure to write more about what I learned from my first safari experience. I hope it won’t be my last.

  1. Under almost all other circumstances, the XF 90mm f/2 WR is the longest, in terms of focal length and physical dimensions, I would typically bring when travelling. ↩︎
  2. A couple years ago, I bought an Osprey Farpoint 55 to use as my only carry-on luggage. This worked great, and I was so happy to not have a wheeled bag to drag behind me over cobblestones in Europe. The key difference there is my X-T1 and XF 10-24mm f/4 was the largest camera combination I had.

    I considered employing the same strategy this time around, but adding in the potential of two large zooms means my camera bag would have consumed almost the entire capacity of the Osprey, making it impossible. ↩︎

  3. We’ve hired a bus to move all 26 of us from place to place. ↩︎
  4. It’s not. Photography kit selection is like design, make it as simple as possible, and no simpler. ↩︎

Fuji Magazines

In the past few months, we’ve been fortunate to see the release of two new magazines, each tailored to our camera make of choice, and both of extremely high quality.

Fuji X Passion

Most recently, I received the inaugural issue of FujiXPassion, a magazine dedicated to sharing inspiration by presenting the work of other photographers. As soon as I opened my copy, I knew it was going to be good. The authors have clearly gone to great lengths to ensure the photography looks its best on the matte, premium stock they’re printed on. The shadow detail preserved in the rocks of the first image, for example, is astounding. Folks who enjoy printed work will be very pleased with the quality here.

Included alongside the images are in-depth Q&A’s with each photographer. You’ll read stories about how the artists got started in photography and often, as you might expect, why they switched from DSLRs to Fuji.

The magazine, which is really verging on book territory, ships in a plastic bag, which is then enclosed in a hard cardboard sleeve, so you can be sure your copy will arrive undamaged.1

FujiLove Magazine

June’s issue is the third of Tomash’s latest Fuji related endeavour, FujiLove magazine. Its format is more of a traditional rag, and so far, the content has been excellent. It contains interviews, photographic essays, gear impressions, tips and tricks, and even user-submitted images of monthly assignments given out by Tomash.

Everything I’ve read in this magazine has totally resonated at best, and felt hugely familiar at worst. It’s fantastic to have this kind of content written by real users of the camera gear we use.

FujiLove is delivered digitally, has an incredible roster of contributors already, and at the cost of large latté, it’s a steal.


  1. Fuji X Passion has an affiliate program, but I am not a member. ↩︎

Photo Storage

I’ve been pushing up against the limits of the internal storage in my MacBook for far too long now. The lack of free space on my boot volume was starting to make my MacBook slower, and resulted in files having to be shuffled to smaller external storage.

I’ve been doing almost as much agonizing over my storage challenges as I have trying to decide what gear to bring on my African adventure. My trip will also leave me with even less space available, so storage is a problem that has to be solved soon. Here’s my thought process.

NAS vs. DAS

The choice is between a NAS (Network Attached Storage) or a DAS (Direct Attached Storage). I like the idea of being able to access my files from anywhere in the house (or world, for that matter), and I really don’t like plugging external hard drives into my MacBook, especially when I’m sitting on a couch, or just want to be mobile.

I’ve been hearing all kinds of good things about Synology products, and almost bought their DiskStation DS716+ → with a third party RAM upgrade, but decided that if I was going to get a NAS, it should have more than 2 bays.1 At the time of my research, Synology didn’t have a unit with 4 or more bays that I was interested in, and being a bit uncertain of how a NAS would impact my workflow, I decided to look at direct storage again.

I had settled on a Promise Pegasus2 R2+ →,2 but I was still struggling with two key aspects:

  1. External RAID arrays are expensive, considering the functionality you can get for similar money with a NAS.
  2. Too many options for direct storage ship with drives pre-installed, and they don’t make information about the manufacturer or the quality of those drives readily available, and if they’re from a less reliable manufacturer, you’re out of luck.

There are diskless options, but to get an enclosure I liked, I was sort of stuck, and without the markup the enclosure manufacturers get on drives, I could end up spending more on the same amount of storage.

Synology to the Rescue

As luck would have it, Synology announced their new DiskStation DS916+ →, which is pretty much exactly what I was hoping for. Better still, the cost for 12TB in Synology’s latest 4-bay NAS is only $20 more than a Promise 8TB Storage Array →. More storage (or equal storage with RAID 5), and way more functionality for $20 more. I’ve since done a bunch more research and a NAS is looking more and more like the way to go.

What I’d Lose

Network attached storage is slower, there’s no getting around that for now. It’s going to hit me particularly hard as the aging MacBook Pro I’m still working on is 802.11n. I have an upgrade planned within the next 6 months, however. I’m also looking into ways of getting more Ethernet access in my home.

Because of the (potentially temporary) slowdown, I’m going to have to make some adjustments to my workflow, setting up more of an archival strategy with my asset management. Once photos have been dealt with, they’ll move off my local storage, and onto the NAS.

I’ll also lose automatic remote backup of my storage solution by opting for a NAS. Backblaze will happily accept whatever files are on any direct attached storage you have hooked up to your computer, but a NAS is off limits without some trickery that I’m not interested in, will cost me more money, and is apparently flakey at best. I’ll likely sign up for CrashPlan on the NAS, and perhaps move my entire cloud backup to them unless Backblaze figures out a way to support NAS (not holding my breath on that).

What I’d Gain

I won’t regale you with the many, many benefits of a Synology, but on the photo side of things, it looks like I’ll be able to log into my NAS while on vacation and upload my RAFs for an on-the-fly backup strategy, provided I don’t blow through anyone’s bandwidth limits. Backups while on vacation has been a bit of a concern. In the past, I’ve pretty much just shot pics until my cards were full, then tucked them away somewhere safe, and hoped for the best. I’ve been fortunate up until now, and always made it home from vacations with my photos, but this is not a good strategy. It would be pretty upsetting to visit a game park at the beginning of my trip, then somehow lose the photos towards the end.

I’ll need to give the NAS backup strategy a try before I go to see just how realistic it is. It will be dependant on the speed my my internet connections.

Conclusion

I went ahead and ordered myself a DS916+ with 8GB of RAM along with four 3GB HGST Deskstar drives,→ which Backblaze reports as consistently having the lowest failure rates.3 I missed ordering when the DS916+ was first in stock, but I’ll be sure to report back on how these things can work in a photographer’s workflow if there’s interest.

  1. I would set my NAS up as RAID 5 to give myself a one drive failure tolerance. ↩︎
  2. I decided to go with a 2-drive array to save some money with the intention of getting a NAS in the future. I also would have considered something from OWC, but I’ve had a couple not so good experiences with their products in the past so I’m hesitant to try them again.
  3. Fun fact, Promise Technology use Toshiba hard drives in their arrays. They have pretty low failure rates, but it's still 3× as many as HGST. ↩︎

Inspiration: Riley Joseph

Today, Riley Joseph published the latest in his series of “Photo Stories,” titled “Palm Springs.” I’ve always enjoyed Riley’s restrained processing style, and the consistency of his eye has been getting better since I first started following him way back when I got my first X Series camera, the X100S. He did more gear-oriented posts back then, but I enjoy the more photographically-focused content just as much.

Riley‘s always captured great photos—nuanced detail missed by the casual observer, clever compositions, and precise timing—but after a few redesigns of his site, he seems to have hit a new stride, and his work has reached new levels. Or maybe he just got around to posting it, I’m not sure.

Anyhow, with Palm Springs, it’s not just how well he captured the time warp of the area he visited, it’s also the presentation. The balance of text and images is just right for me, and I found it wonderfully compelling. I really felt like I was there with him, seeing through time, so to speak, and he was reminiscing about a shared experience. It is indeed, storytelling.

Check out Palm Springs, and Riley’s other Photo Stories.

Palm Springs, Riley Joseph

Palm Springs, Riley Joseph

Paml Springs, Riley Joseph

Paml Springs, Riley Joseph

Palm Springs, Riley Joseph

Palm Springs, Riley Joseph

Deal: Big X-Series Lens Sale

If you haven’t already heard, Fuji has another big sale happening on just about all their lenses. A couple standouts are the XF 14mm f/2.8 for $499 (save $400), and the XF 16mm f/1.4 WR for $699 (save $300).

On the long end, you can get an XF 1.4 Teleconverter for $100 if you pair it with either the XF 50-140mm f/2.8 or XF 100-400mm f/4.5-5.6.

And of course, B&H has all the same deals as well. Get ’em while the gettin’s good.

JPEG is My Friend

This fantastic piece from Lee Varis starts with a refrain many of us have heard, Fuji’s JPEGs are great, but then quickly moves into some excellent examples that demonstrate how. It’s a must read or watch (I watched), and it’s nice to see Astia get some love.

My only caution might be on layering a JPEG over a RAF. You’ll want to be mindful of Fuji’s in-camera corrections, depending on which lens you have mounted. Another approach might be to shoot with Film Simulation bracketing and use one of the colour Film Simulations for the layering. Cool effect either way.