What I Learned on Safari

While I was posting a 3 part series of prepping for South Africa, I knew I’d be writing a follow up post about what I got right, and what I got wrong.

Here’s what I learned after three days, five game drives, a couple of nature walks, and many hours posted up in a “hide” near the watering hole while on “Safari” in Honeyguide’s Mantobeni Tented Safari Camp.1

Learning Curve

A lot of what follows only occurred to me after a couple sessions of shooting. In truth, before getting my XF 50-140mm F2.8 WR, the longest focal length I had used with any regularity was an 85mm on APS-C. I mostly use the XF 50-140mm F2.8 WR in a studio setting, so outside of practicing in my backyard on squirrels and birds as much as possible, shooting with lenses this long was a fairly new experience. Even the act of finding an animal you’ve seen with your eyes through a viewfinder at 200mm or higher can be tricky. In my limited time out in the bush, I got quite a bit better at it, but by no means am I proficient. I would need much more experience. You gotta start somewhere though, and the point is, if you’ve never done this kind of shooting before, get as much practice as possible, and expect a learning curve of your own.

Camera Bodies

The X-Pro2 faired well on the drives, and I could feel the performance boost it offers over previous bodies, but the X-T1 outclassed it in terms of operational capabilities. The tilt screen came in really handy at times when I wanted to rest the XF 100-400mm F4.5-5.6 WR on my Safari Sack beanbag,→ which in turn was rested on an armrest at thigh height as I was seated. Often animals were relatively still, and I wanted to lock focus on them, glance down at the tilted LCD on occasion, and otherwise watch the animals “IRL” so to speak, and burst 8 frames per second when I caught or anticipated a good expression from the animal. This is another thing that takes practice, lest you find yourself with dozens or even hundreds of frames to wade through in post, like I did.

Two X-T2’s would have been the best of both camera worlds in this situation, and would be my ideal body configuration, were I to visit another game park in the near future. I really wish that camera had been available before I left.

I opted for the battery grip on the X-T1, and would do with X-T2s as well. Not only was the grip convenient from a handling perspective, the extra battery gave me confidence I wouldn’t run out of power on a drive. As it turns out, I was overly cautious here.

Lenses

On my first drive, I brought my X-T1 with vertical grip and XF 100-400mm F4.5-5.6 WR attached, and my X-Pro2 with XF 16-55mm F2.8 WR attached. I figured this would be the right balance of coverage for my first time out to assess future drives.

What I found was the standard zoom was of almost no value, despite our driver getting us remarkably close to the animals. I don’t think I took a single frame with it that wasn’t zoomed in towards the top end of its focal range. Since that is covered by the XF 50-140mm F2.8 WR, I knew I’d be swapping the standard zoom for it on the next drive.

I didn’t even think about changing lenses during my game drives. I would have just been asking for a ton of dust on my sensor. I would recommend against lens changes.

Teleconverter

Given I had considered not even bringing the XF 100-400mm F4.5-5.6 WR, I decided to do the first drive without the 2× teleconverter. Reports indicate there is at least a bit of an optical penalty with the 2× teleconverter, and I’ve noticed that as well,2 but on our first drive, we were lucky enough to catch a pair of leopard cubs that I really wanted to get closer to.

From that drive on, my camera setup was the X-T1 with 2× teleconverter and XF 100-400mm F4.5-5.6 WR, and the X-Pro2 with XF 50-140mm F2.8 WR.

Batteries

If you’re judicious about turning your camera off when not in use, one battery per camera should get you through a 3 hour game drive just fine. I have no idea if that’s a standard duration, but the time of the drives seemed to work for capturing animals when they were active, and the best light of the day. After a drive, I’d get two batteries charging in this Watson Duo Battery Charger,→3 which I highly recommend. It’s a little bigger than I’d like, and I brought two Fuji chargers as backup, but it worked flawlessly, showed me how much charge my batteries had, and charged them up really quickly. You can even buy replacement plates for it and charge, say, an X-Pro2 and X100T battery at the same time. I travelled with a total of seven batteries, but I could have done the trip quite easily with five.

Accessories

All those beanbag recommendations you’ve read are spot on. I bought a Safari Sack before I left, and it was indispensable.

My Really Right Stuff Safari Clamp saw some use on the drives, especially during the time I needed to get higher than the beanbag would allow, and holding a camera with the XF 100-400mm F4.5-5.6 WR attached would get tiring. It turned out to be more useful at other times, like when my tripod was temporarily confiscated before getting on the boat to Robben Island. I would have been really bummed if I wasn’t able to capture a pano of Cape Town from the island, and there were plenty of railings near the water for me to clamp onto.

Cape Town and Table Mountain as seen from Robben Island

I was looking into a monopod as Thom Hogan suggests before my trip, but truthfully, I can’t think of a time when it would have worked much better than what I had, and it probably would have got in the way. Perhaps I could have extended it fully with it planted on the ground and hung out the side of the vehicle a bit more, but often things happened so fast there was barely time to “set up.” I was tossing my beanbag from one place to another, and at times forgoing it altogether to snap a frame before more active animals moved again. Plus, we were to remain seated during the drives, as the vehicle changing shape can (allegedly) alert the animals, and we had a canopy over us anyhow; two good reasons not to stand during the drive. In other parks, it seems you stand up, and in those instances, a monopod might be just the ticket. Depending on where I go, I may have one by the time I head back to Africa.

The repacement EC-XT-L Eye Cup→ for the X-T1 helped a lot in the bright sun. This isn’t something X-T2 users need to be concerned about, but if you are bringing an X-T1 or two, I would highly recommend buying a couple of these.

Other

As mentioned, you’d be nuts to have your sensor exposed during a game drive, but when we stopped for our mid-drive coffee/wine break, I would have been totally fine with a non-dust-resistant camera like an X70. I ended up using my iPhone for this, which was fine, but it’s not the same. I’m still not sure it would be worth hauling a second set of batteries/chargers, but worth considering. If a camera is in your bag, it won’t get affected by the elements.

Wishlist

I’d love for Fuji to release a 300mm or 400mm f/2.8 or faster WR lens that matches the optical quality of the XF 90mm F2 WR. The XF 100-400mm F4.5-5.6 WR is a superbly versatile lens, and is optically decent, but a fast prime would allow for lower ISOs on top of presumably being much sharper.

Closing

Apart from wanting a faster, sharper exotic lens and wishing the X-T2 had been released a little bit earlier, I don’t feel as though I was let down by my equipment in any way while on Safari. It was my own technique, and luck of the animal draw that had the biggest impact on my photographs. I may write a subsequent post detailing my learnings from such a big trip overall; what gear I used most, what, if anything, could I have left behind, etc.

As for the Safari experience itself, it was absolutely incredible, and something you really should try to do at least once if you have the means. Africa wasn’t even on our radar as a travel destination before this opportunity presented itself, and we couldn’t be happier it did. I don’t have a particularly large frame of reference, but family members who have been to a variety of game parks agreed that Honeyguide are a fantastic company. If you happen to visit, Fanuel is an extraordinary driver who will do absolutely everything he can to get you close to the animals in a way that still respects their wellbeing.

About the Image

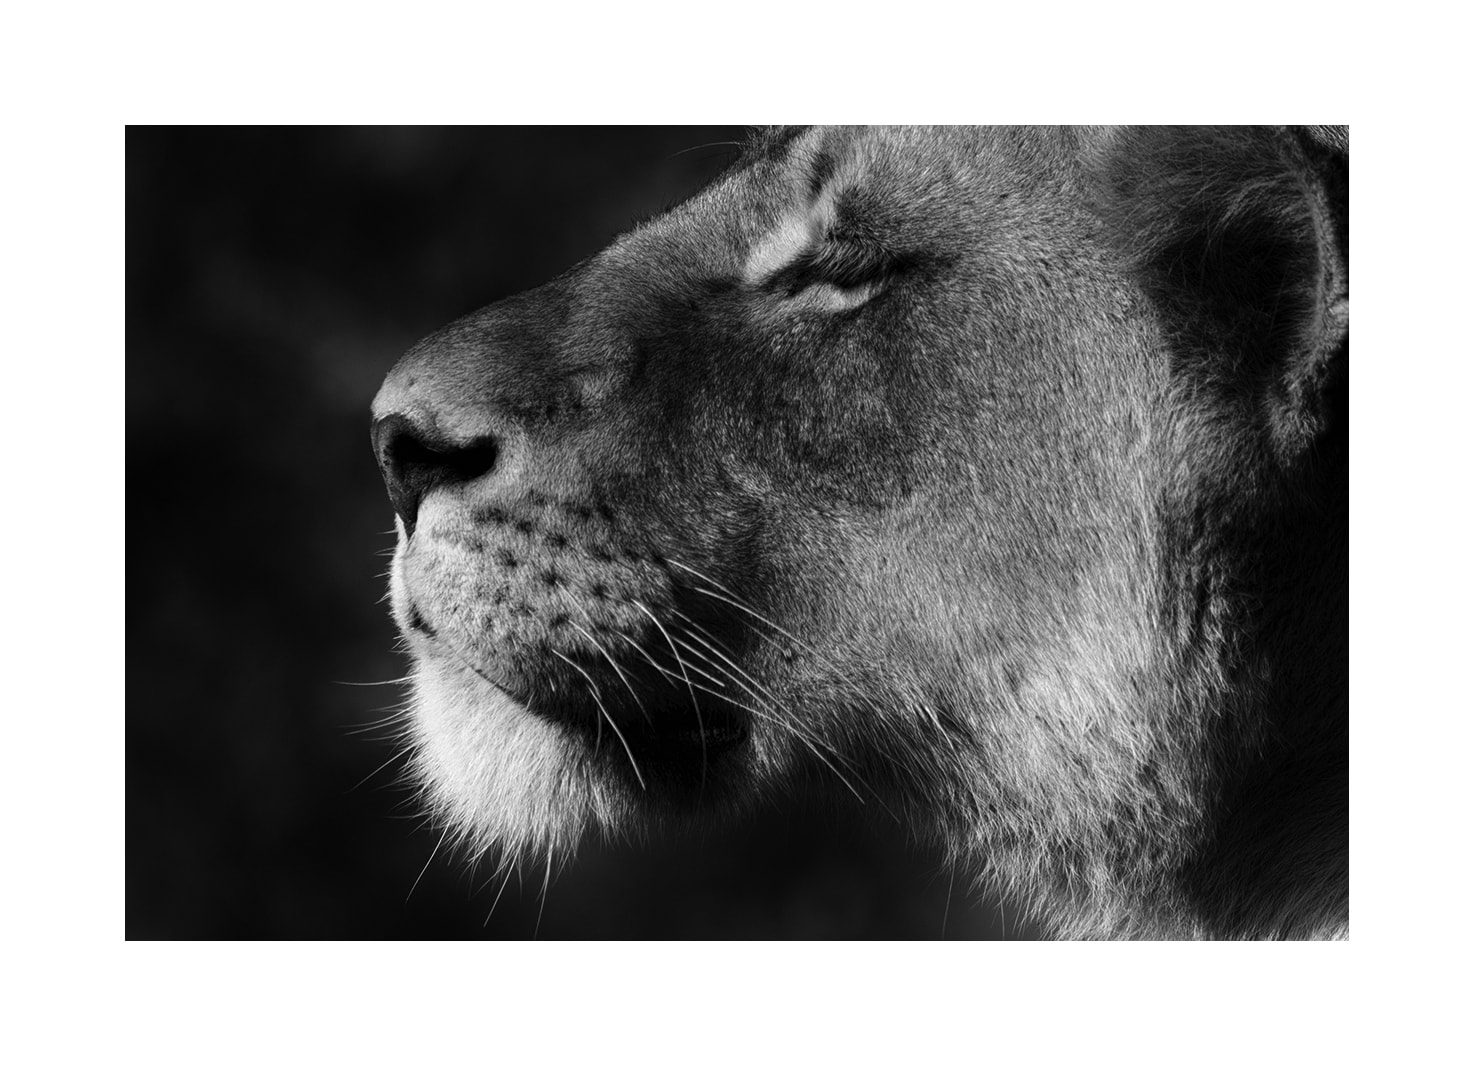
X-T1 + XF 100-400mm F4.5-5.6 WR at 280mm
XF 2× TC
1/500 sec. at f/5.2, ISO 500

I chose this image of a female from a series of images because this one appears particularly wise; a fitting trait for a post about learnings. We were able to get incredibly close to about 5 female lions who were all mostly lounging around. This profile is from when one raised her head to give us a smell.

I started with a RAF in this case, despite working with a pre-X-Trans III. Sharpness wasn’t my primary goal here, and I wanted as much information as possible to run the image through Silver Efex Pro.4 I’m quite pleased with the result.

  1. Footnote review: You can’t go wrong with Honeyguide Tented Safari Camps. The lodgings were fantastic, the food sublime, and the animals plentiful. During our stay, trucks saw “the big five” in a single outing multiple times. Your mileage will vary, of course, but we were pretty fortunate, and I hope to return to that park one day. ↩︎
  2. Where I’m seeing it worst in reviewing my images is when focused at infinity on objects that are very far away, perhaps a kilometre or more. Closer subjects appear to be rendered sharper, but I’ll report back after further review. ↩︎
  3. Another product I plan to do a review on, but what I’ll say now is if you have an X100 or X70 along with your interchangeable lens Fuji camera, you can just buy a set of NP-95 plates along with the WP-126 Duo charger, and you’re good to go. I even had one of each batter charging ok in mine. Great stuff. ↩︎
  4. Still sad Google bought and abandoned the Nik Collection of software, but at least it’s free for as long as it runs. ↩︎

Back in Action

It’s been a while. Too long. A variety of things contributed to my extended absence. The biggest was an unexpected move from one end of the city to the other. This consumed significantly more time than I expected, and I’m still not quite finished yet. In order to secure the new house, we accepted a very long close at the end of June 2017. That said, the crazy parts of finding a house, buying it, staging our current house, selling it, then finding a place to rent for six months have all been taken care of, so I should be able to get back to some sense of normalcy. Plus, both the rental property and the new house will have a dedicated studio space (as opposed to the basement corner I currently work in) and that should hasten my ability to test gear and produce content substantially. I am very excited about this.

The other issue is backorders. I still don’t have my copy of the X-T2 and XF 23mm F2. I had the opportunity to try the X-T2 a few months back, and used it a fair bit, but not enough for me to feel comfortable doing one of my typical handling reviews. That, and a comparison of Fuji’s 23mm offerings will come as soon as possible.

Finally, the move put a severe damper on my ability to get through the photos from my trip, and get that photographic workflow I mentioned sorted, I’m only now getting through both of those things. I’ve been eager to share images from my trip, and will do so soon.

Man, it’s good to be writing again.

About the Image 1

X-T1 + XF 10-24mm F4 at 10mm
10-stop ND filter
30 sec. at f/8, ISO 200
Really Right Stuff TQC-14 tripod, BH-30 Compact Ballhead, and L-Plate

This is image was captured a little over two years ago right near where I will soon be living. Torontonians will likely recognize it immediately.

The 10-stop neutral density filter resulted a huge amount of vignetting that I think adds to the image, as well as a warmish colour cast that B+W ND filters are known (notorious?) for. I’ve since switched to Breakthrough Photography for all my neutral density needs. I knocked the blacks down to emphasize the falloff and mood, bumped the Clarity and Vibrance a little in the sky, and removed some of the larger distracting pebbles in Photoshop.

I chose JPEG as my starting point on this image, having captured both JPEG and RAF. I still can’t get acceptably sharp images out of Lightroom when processing X-Trans II and earlier RAFs. When I shot this, I was still testing out the in-camera Sharpness settings, and had them set too high, resulting in some sharpening halos around the fine detail. Fortunately, downsampling the image for the site reduces the halos significantly, as seen on a retina display. Moral of that story, take care when shooting with sharpness set higher than its default on JPEGs you have any intention of doing post work on.

Aesthetically, I like how the swirling in the clouds, the lines of the boats and the dock, and the elliptical inlet work together, and the wide angle works with the pebbly sand to draw the eye to the Lifeguard Station.

  1. One sensible piece of constructive criticism I once received about this site was that I don’t include enough actual photos captured by the equipment I review on a technical level. It’s a fair criticism. My intention was always to include more example photos in the reviews of lenses, but I have fallen short on getting those review posted.

    This image is the start of my attempt to add more example images that will hopefully be mostly relevant to the written content, with a quick blurb on how it was created. Please don’t hesitate if this is something you’d like to see more or less of.

How I Packed for South Africa

Note: This post has been written over the course of a week, and partially during my trip with spotty access to WiFi, so it is not as clear or concise as I’d like.

I thought I was way ahead of the game, and that I’d have lots of time to get a few more prepping posts online, but busy times at work and in life resulted in my trip sneaking up on me.

As I sit in Schiphol airport waiting to connect to Johannesburg, I’m left with nothing but time to reflect and write about how things turned out. There’s been some pretty big shifts in my packing strategy since I last wrote about it, so I’ll try to do a decent summary.

Think Tank Airport Essentials

My Think Tank Airport Essentials arrived a few weeks ago. This bag has supplanted my Incase “DSLR” Pro Pack as my daily backpack for carrying my work essentials and some camera gear to work and home every day. I love it.

Unfortunately, despite my best efforts, there was no hope it was going to be enough bag for my entire trip, largely due to the longer telephoto lenses I felt obligated to bring. The amount of stuff I can get in this bag is incredible, and without those zooms,1 I could easily get two weeks of travel out of the Airport Essentials.

Baggage Claim

I sort of felt like I was failing here, but my wife and I resigned ourselves to having to check a bag each this time around.2 The varied South African climate we expect to face combined with family events we have planned means we need a lot more clothes than we’d typically pack.

Given the unique nature of this travel experience, and that we shouldn’t need to worry too much about moving our bags around,3 it makes sense to optimize for more gear, and that means another bag.

Briggs and Riley

As much as I wanted to tell myself that my Osprey Farpoint 55 S/M would be the last bag I ever needed, there is sure to be other travel occasions where carry-on-only will be less than ideal. Patagonia and New Zealand spring to mind. So I started looking into what an optimal piece if luggage would be. I wanted to stick to carry-on size regardless for when I might travel with just a carry-on, and a backpack wouldn’t work. The Wirecutter has a pretty great breakdown of carry-on luggage. They pick the Travelpro Platinum Magna2 22" bag,→ but in my local currency, their “upgrade,” the Briggs and Riley Baseline International,→ is about the same price, making it the sensible purchase.

I might do up a more in-depth review of this bag as it relates to travel/adventure photography one of these days, but having packed and unpacked it a number of times already, I can say the quality is excellent, and the compression system is everything it’s made out to be.

Back to Camera Stuff

With my Think Tank bag freed from having to accommodate clothing, I found myself with much more space available for gear. I decided to give myself permission to really gear up for this trip. That means both the XF 50-140mm F2.8 WR and XF 100-400mm F4.5-5.6 WR have come with me, along with the 2× teleconverter to get me as close as Fujily possible to the indigenous fauna. Since I had the space, I decided to chuck the XF 10-24mm f/4 in for good wide measure.

It’s Heavy

My camera gear selection is as follows:

Bodies

Lenses

Support

Other

I haven’t carried this much photographic equipment since the first time I travelled with my D300, when I though it was a good idea to bring everything I owned.4 For such a big trip that has so many different photographic opportunities, it made sense to err on the side of too much, rather than too little.

Perhaps I could have gotten away with leaving the XF 16-55mm f/2.8 WR or XF 10-24mm f/4 at home, but I have used both already, and you’ll note that one lonely lens is missing those two magical initials, “WR.”

My South African family has let me know that, despite the current drought, Cape Town can be quite rainy. This is a place I’m going to want to do some landscape photos. Sure I could get by with my XF 16mm f/1.4 WR, but if I can get myself the flexibility of a zoom lens, I figure I might as well. And that way, if we do find ourselves in heavy rain, I can keep lenses on bodies and not worry about having to change them. Once again, that lack of WR on the XF 10-24mm f/4 is hurting me. Had the 10-24mm been weather sealed, I would have only brought it and not the 16-55mm.

Had I been packing “normally,” three of those lenses and the teleconverter wouldn’t have even seen my bag, but there’s a good chance I won’t be back to South Africa for quite some time, if ever, and since we’re being driven around, I have the luxury of leaving what I don’t need in my hotel room, or on the bus. More often than not, I’m carrying my Billingham Hadley Small.

Additionally, if this was exclusively a “Safari” vacation, at least two lenses could be left out, and maybe even the tripod, depending on the camp.

Straps

I decided to keep my green Artisan & Artist strap on my X-Pro2, and affixed the replacement Loop 3 the guys at LumaLabs were kind enough to send after my first one frayed. The Loop is a strap I typically only use during extended periods of shooting like on vacation—for which it is outstanding—so this is a perfect opportunity to double check the strap durability. I’ll update the review post, but so far so good.

Memory Cards

Lexar is sorta scummy when it comes to the transfer speeds they list on their cards. They like to list a really fast read speed, which, when it comes to continuous shooting, is much less important. The write speeds are always much slower until you get up to their 2,000× cards, which are twice as expensive as their 1,000× cards.

Sandisk, on the other hand, has much closer figures for both read and write. The Extreme PRO cards→ that I went with have a listed read speed of 95 MB/s, and a write speed of 90 MB/s. I’ve hit the ceiling on the write speed quite a few times, but not enough for me to worry about spending the money for faster cards, and I've been perfectly content to just switch cameras for a different perspective while the buffer clears on the other. I went for 64GB cards, six in total along with a bunch of older, slower 32GB cards as backup. I seriously doubt I’ll touch those though.

Clothing

Your attire can often be almost as important as what camera you have. If you’re not comfortable due to the elements, sore feet, or an aching back, you’re much less likely to want to shoot. Quality footwear, and clothing that can keep you comfortable in a broad range of climates are invaluable. My wife and I have a bunch of merino wool clothing, largely from Icebreaker (although I would avoid their T-shirts which a very prone to developing holes),→ which has kept us warm in the frigid winter mornings without getting too hot too fast after the sun comes up.

Another major advantage of merino is it can be worn for days without smelling. This might not sound appealing from a hygiene perspective, but it’s been really nice pulling on a pair of pants or a hoody after sitting around a fire without it reeking of smoke.

In Closing

Well, this post has been in a constant state of revision, from past to present tense, before using any of my equipment to being done nearly all our game drives. I’ll be sure to write more about what I learned from my first safari experience. I hope it won’t be my last.

  1. Under almost all other circumstances, the XF 90mm f/2 WR is the longest, in terms of focal length and physical dimensions, I would typically bring when travelling. ↩︎
  2. A couple years ago, I bought an Osprey Farpoint 55 to use as my only carry-on luggage. This worked great, and I was so happy to not have a wheeled bag to drag behind me over cobblestones in Europe. The key difference there is my X-T1 and XF 10-24mm f/4 was the largest camera combination I had.

    I considered employing the same strategy this time around, but adding in the potential of two large zooms means my camera bag would have consumed almost the entire capacity of the Osprey, making it impossible. ↩︎

  3. We’ve hired a bus to move all 26 of us from place to place. ↩︎
  4. It’s not. Photography kit selection is like design, make it as simple as possible, and no simpler. ↩︎

Fuji Magazines

In the past few months, we’ve been fortunate to see the release of two new magazines, each tailored to our camera make of choice, and both of extremely high quality.

Fuji X Passion

Most recently, I received the inaugural issue of FujiXPassion, a magazine dedicated to sharing inspiration by presenting the work of other photographers. As soon as I opened my copy, I knew it was going to be good. The authors have clearly gone to great lengths to ensure the photography looks its best on the matte, premium stock they’re printed on. The shadow detail preserved in the rocks of the first image, for example, is astounding. Folks who enjoy printed work will be very pleased with the quality here.

Included alongside the images are in-depth Q&A’s with each photographer. You’ll read stories about how the artists got started in photography and often, as you might expect, why they switched from DSLRs to Fuji.

The magazine, which is really verging on book territory, ships in a plastic bag, which is then enclosed in a hard cardboard sleeve, so you can be sure your copy will arrive undamaged.1

FujiLove Magazine

June’s issue is the third of Tomash’s latest Fuji related endeavour, FujiLove magazine. Its format is more of a traditional rag, and so far, the content has been excellent. It contains interviews, photographic essays, gear impressions, tips and tricks, and even user-submitted images of monthly assignments given out by Tomash.

Everything I’ve read in this magazine has totally resonated at best, and felt hugely familiar at worst. It’s fantastic to have this kind of content written by real users of the camera gear we use.

FujiLove is delivered digitally, has an incredible roster of contributors already, and at the cost of large latté, it’s a steal.


  1. Fuji X Passion has an affiliate program, but I am not a member. ↩︎

Photo Storage

I’ve been pushing up against the limits of the internal storage in my MacBook for far too long now. The lack of free space on my boot volume was starting to make my MacBook slower, and resulted in files having to be shuffled to smaller external storage.

I’ve been doing almost as much agonizing over my storage challenges as I have trying to decide what gear to bring on my African adventure. My trip will also leave me with even less space available, so storage is a problem that has to be solved soon. Here’s my thought process.

NAS vs. DAS

The choice is between a NAS (Network Attached Storage) or a DAS (Direct Attached Storage). I like the idea of being able to access my files from anywhere in the house (or world, for that matter), and I really don’t like plugging external hard drives into my MacBook, especially when I’m sitting on a couch, or just want to be mobile.

I’ve been hearing all kinds of good things about Synology products, and almost bought their DiskStation DS716+ → with a third party RAM upgrade, but decided that if I was going to get a NAS, it should have more than 2 bays.1 At the time of my research, Synology didn’t have a unit with 4 or more bays that I was interested in, and being a bit uncertain of how a NAS would impact my workflow, I decided to look at direct storage again.

I had settled on a Promise Pegasus2 R2+ →,2 but I was still struggling with two key aspects:

  1. External RAID arrays are expensive, considering the functionality you can get for similar money with a NAS.
  2. Too many options for direct storage ship with drives pre-installed, and they don’t make information about the manufacturer or the quality of those drives readily available, and if they’re from a less reliable manufacturer, you’re out of luck.

There are diskless options, but to get an enclosure I liked, I was sort of stuck, and without the markup the enclosure manufacturers get on drives, I could end up spending more on the same amount of storage.

Synology to the Rescue

As luck would have it, Synology announced their new DiskStation DS916+ →, which is pretty much exactly what I was hoping for. Better still, the cost for 12TB in Synology’s latest 4-bay NAS is only $20 more than a Promise 8TB Storage Array →. More storage (or equal storage with RAID 5), and way more functionality for $20 more. I’ve since done a bunch more research and a NAS is looking more and more like the way to go.

What I’d Lose

Network attached storage is slower, there’s no getting around that for now. It’s going to hit me particularly hard as the aging MacBook Pro I’m still working on is 802.11n. I have an upgrade planned within the next 6 months, however. I’m also looking into ways of getting more Ethernet access in my home.

Because of the (potentially temporary) slowdown, I’m going to have to make some adjustments to my workflow, setting up more of an archival strategy with my asset management. Once photos have been dealt with, they’ll move off my local storage, and onto the NAS.

I’ll also lose automatic remote backup of my storage solution by opting for a NAS. Backblaze will happily accept whatever files are on any direct attached storage you have hooked up to your computer, but a NAS is off limits without some trickery that I’m not interested in, will cost me more money, and is apparently flakey at best. I’ll likely sign up for CrashPlan on the NAS, and perhaps move my entire cloud backup to them unless Backblaze figures out a way to support NAS (not holding my breath on that).

What I’d Gain

I won’t regale you with the many, many benefits of a Synology, but on the photo side of things, it looks like I’ll be able to log into my NAS while on vacation and upload my RAFs for an on-the-fly backup strategy, provided I don’t blow through anyone’s bandwidth limits. Backups while on vacation has been a bit of a concern. In the past, I’ve pretty much just shot pics until my cards were full, then tucked them away somewhere safe, and hoped for the best. I’ve been fortunate up until now, and always made it home from vacations with my photos, but this is not a good strategy. It would be pretty upsetting to visit a game park at the beginning of my trip, then somehow lose the photos towards the end.

I’ll need to give the NAS backup strategy a try before I go to see just how realistic it is. It will be dependant on the speed my my internet connections.

Conclusion

I went ahead and ordered myself a DS916+ with 8GB of RAM along with four 3GB HGST Deskstar drives,→ which Backblaze reports as consistently having the lowest failure rates.3 I missed ordering when the DS916+ was first in stock, but I’ll be sure to report back on how these things can work in a photographer’s workflow if there’s interest.

  1. I would set my NAS up as RAID 5 to give myself a one drive failure tolerance. ↩︎
  2. I decided to go with a 2-drive array to save some money with the intention of getting a NAS in the future. I also would have considered something from OWC, but I’ve had a couple not so good experiences with their products in the past so I’m hesitant to try them again.
  3. Fun fact, Promise Technology use Toshiba hard drives in their arrays. They have pretty low failure rates, but it's still 3× as many as HGST. ↩︎